
Motion Path
The Motion Path behavior lets you create a 2D or 3D motion path for an object to follow.
When you first apply the Motion Path behavior, it defaults to an open spline—a straight
line defined by two points at the beginning and end of the motion path. You can also
choose from preset path shapes, such as a closed spline, loop, rectangle, or wave, or use
a shape to define a path. A shape used as the source for a motion path can be animated.
You can modify the motion path in 3D space so an object travels on the path along the
path’s X, Y, and Z axes. For more information, see
Adjusting a Motion Path in 3D Space
.
The first point on the path is the position of the object in the Canvas at the first frame of
the behavior. Option-click anywhere on the path to add Bezier points, which allow you
to reshape the motion path by creating curves.
399
Chapter 9
Using Behaviors

Note: To show or hide the motion path, choose Show Overlays from the View pop-up
menu in the status bar. (The Animation Path option shows and hides the animation paths
of other behaviors.)
When you play the project, the object moves along the assigned path. The speed at which
the target object travels is defined by the duration of the behavior. Speed is also affected
by the Speed parameter, which lets you modify the object’s velocity—adding acceleration
and deceleration at the beginning and end of the behavior, for example. You can also
create a custom preset defining how the object travels along the path.
Note: When you switch between the Path Shape options, the Inspector and the HUD
display parameters specific to the selected option.
The Motion Path behavior is an easy way to create predictable motion without using the
Keyframe Editor. It’s also a great way to create reusable motion paths that you can save
in the Library for future use.
When the Motion Path behavior is added to an object, the Adjust Item tool is selected,
allowing you to modify the default path in the Canvas by adding points and using the
Bezier (or B-Spline) controls attached to each point to adjust each curve. You can also
move and resize preset motion path shapes, such as a rectangle or wave, in the Canvas.
Parameters in the Inspector
Path Shape:
A pop-up menu that lets you define the shape of the path on which the
object travels.
• Open Spline: The default shape, a straight path defined by two points at the beginning
and end of the path. You can choose to work with Bezier or B-Spline control points.
Option-click (or double-click) anywhere on the path to add points.
• Closed Spline: A closed path in which the last point is in the same location as the first
point. You can choose to work with Bezier or B-Spline control points. Option-click (or
double-click) anywhere on the path to add points.
400
Chapter 9
Using Behaviors
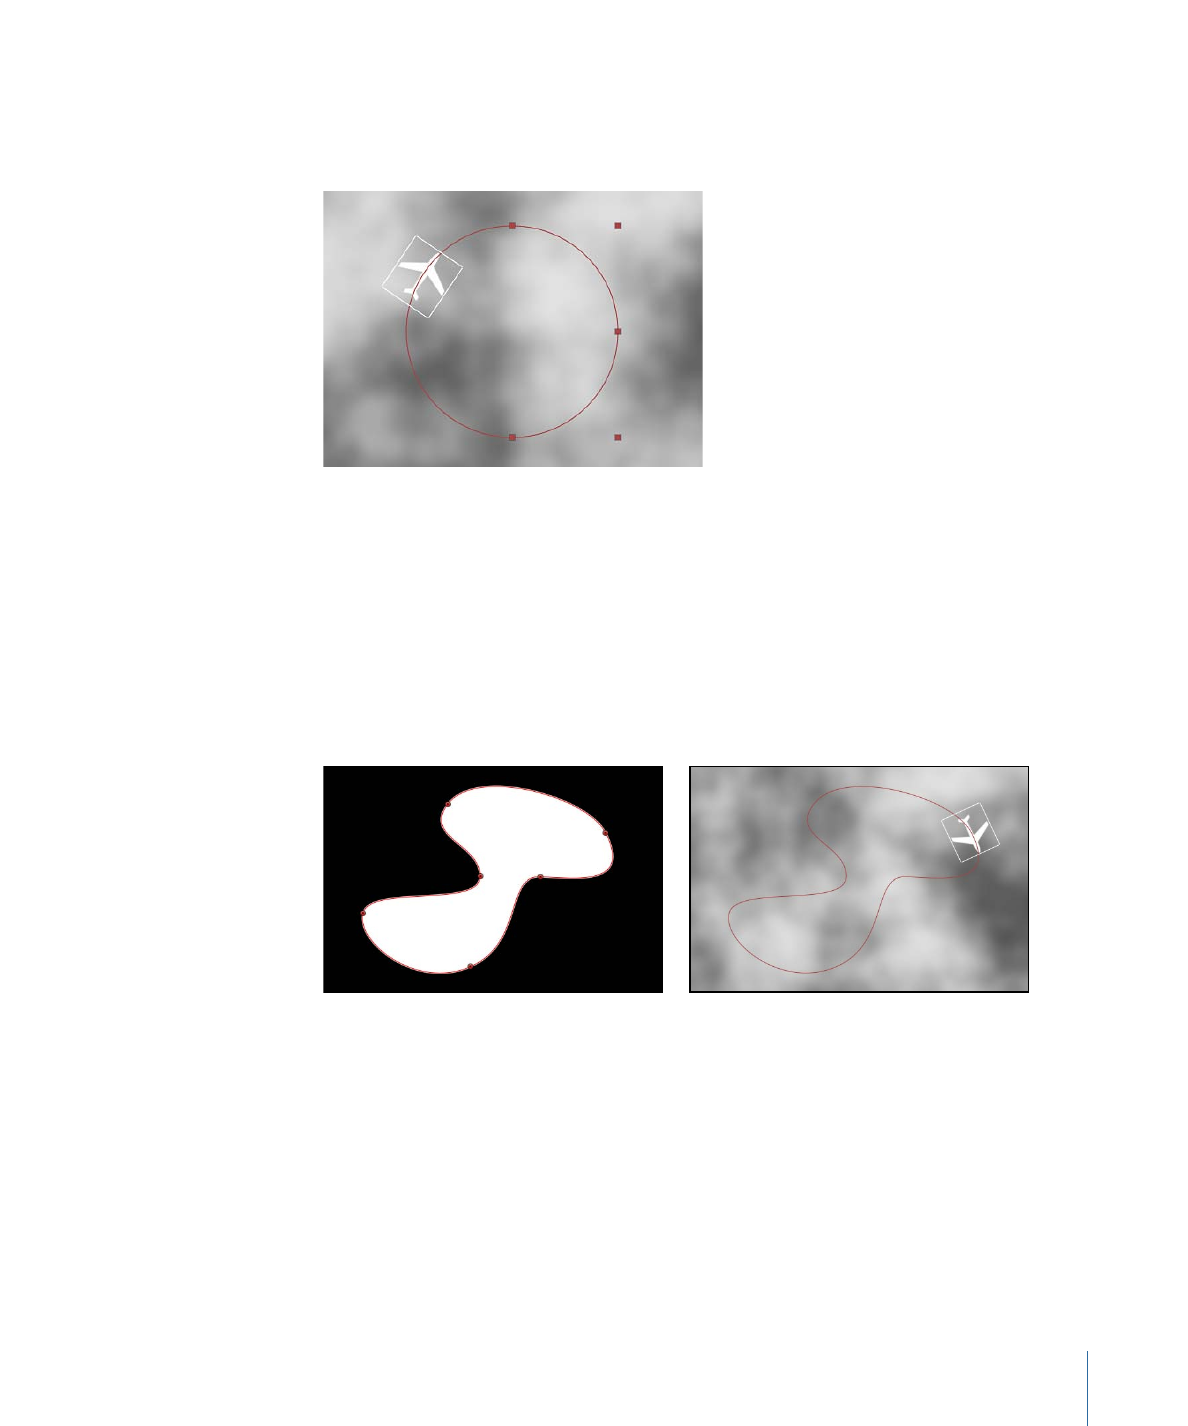
• Circle: A simplified version of Closed Spline, in which the X radius or Y radius can be
adjusted to create a circle or an ellipse. Use the outer control points to resize the circle
(or rectangle) motion path’s shape.
• Rectangle: A closed path in which the width and the height can be adjusted to create
a square or a rectangle.
• Wave: A wavy path (a sine wave) defined by two points, one at the beginning and one
at the end of the path, and controlled by the End Point, Amplitude, Frequency, Phase,
and Damping parameters.
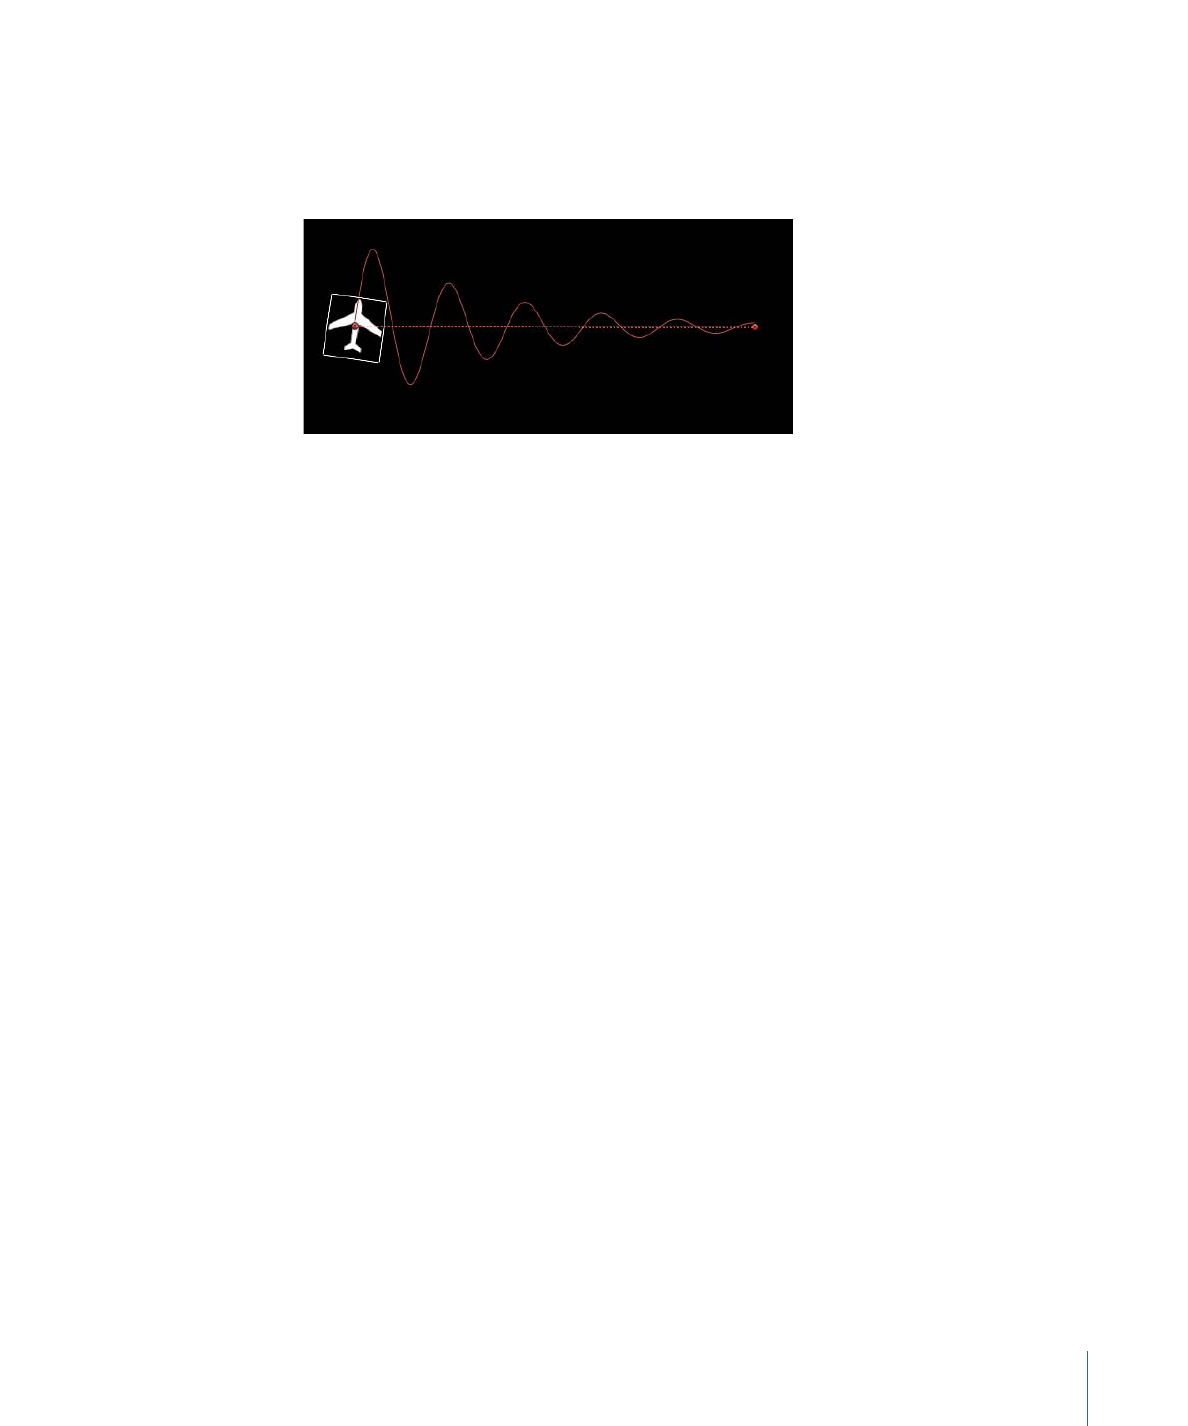
• Geometry: The object travels along the edge of a shape or mask used as the source for
the path. In the following figure, the outline of the shape on the left is used as the
motion path in the composition shown on the right.
Note: The Path Shape parameters work similarly to text on a path. For more information
about working with text on a path, see
Working with Text on a Path
.
Shape Type:
When Path Shape is set to Open Spline or Closed Spline, this pop-up menu
allows you to choose one of two ways to manipulate the shape of the path: Bezier or
B-Spline.
• Bezier: Lets you manipulate the keyframe curve manually by dragging the handles.
Note: For more information about creating and adjusting Bezier curves, see
Editing
Bezier Control Points
.
401
Chapter 9
Using Behaviors

• B-Spline: B-Splines are manipulated using only points—there are no tangent handles.
The points themselves do not lie on the surface of the shape. Instead, each B-Spline
control point is offset from the shape’s surface, magnetically pulling that section of the
shape toward itself to create a curve. B-Splines are extremely smooth—by default, there
are no sharp angles in B-Spline shapes, although you can create sharper curves, if
necessary.
Note: For more information about working with B-Spline curves, see
Editing B-Spline
Control Points
.
Radius:
When Circle is the defined path shape, this slider allows you to change the size
of the circular path. Click the disclosure triangle to individually adjust the X radius and Y
radius.
Note: When the Motion Path behavior is selected, you can also use the onscreen control
points to resize the circle. Press Shift to resize the X and Y radii uniformly.
Size:
When Rectangle is the defined path shape, this slider allows you to change the size
of the rectangular path. Click the disclosure triangle to individually adjust the X scale and
Y scale.
Note: When the Motion Path behavior is selected, you can also use the onscreen control
points to resize the rectangle. Press Shift to resize the X and Y scales uniformly.
Offset:
When Circle, Rectangle, or Geometry is the defined path shape, this slider lets
you specify where the object starts moving on the path.
End Points:
When Wave is the defined path shape, this control sets the location of two
default points on the wave’s path. The end points can also be adjusted using the wave’s
onscreen controls (active by default when the Motion Path behavior is selected). Moving
the left end point moves the entire path; moving the right end point lengthens, shortens,
or angles the path.
Amplitude:
When Wave is the defined path shape, this slider defines half the distance
from the highest point to the lowest point in the wave. Higher values result in more
extreme waves.
Frequency:
When Wave is the defined path shape, this slider sets the number of waves.
Higher values result in more waves.
Phase:
When Wave is the defined path shape, this dial defines the degrees of the offset
of the waves from the start and end points of the path. When set to 0 degrees (default),
the wave begins and ends at half the distance from the highest point to the lowest point
in the wave. When set to 90 degrees, the wave begins and ends at the highest point in
the wave. When set to –90 degrees, the wave begins at the lowest point in the wave.
When set to 180 degrees, the waves are the same as 0 degrees, but inverted.
402
Chapter 9
Using Behaviors
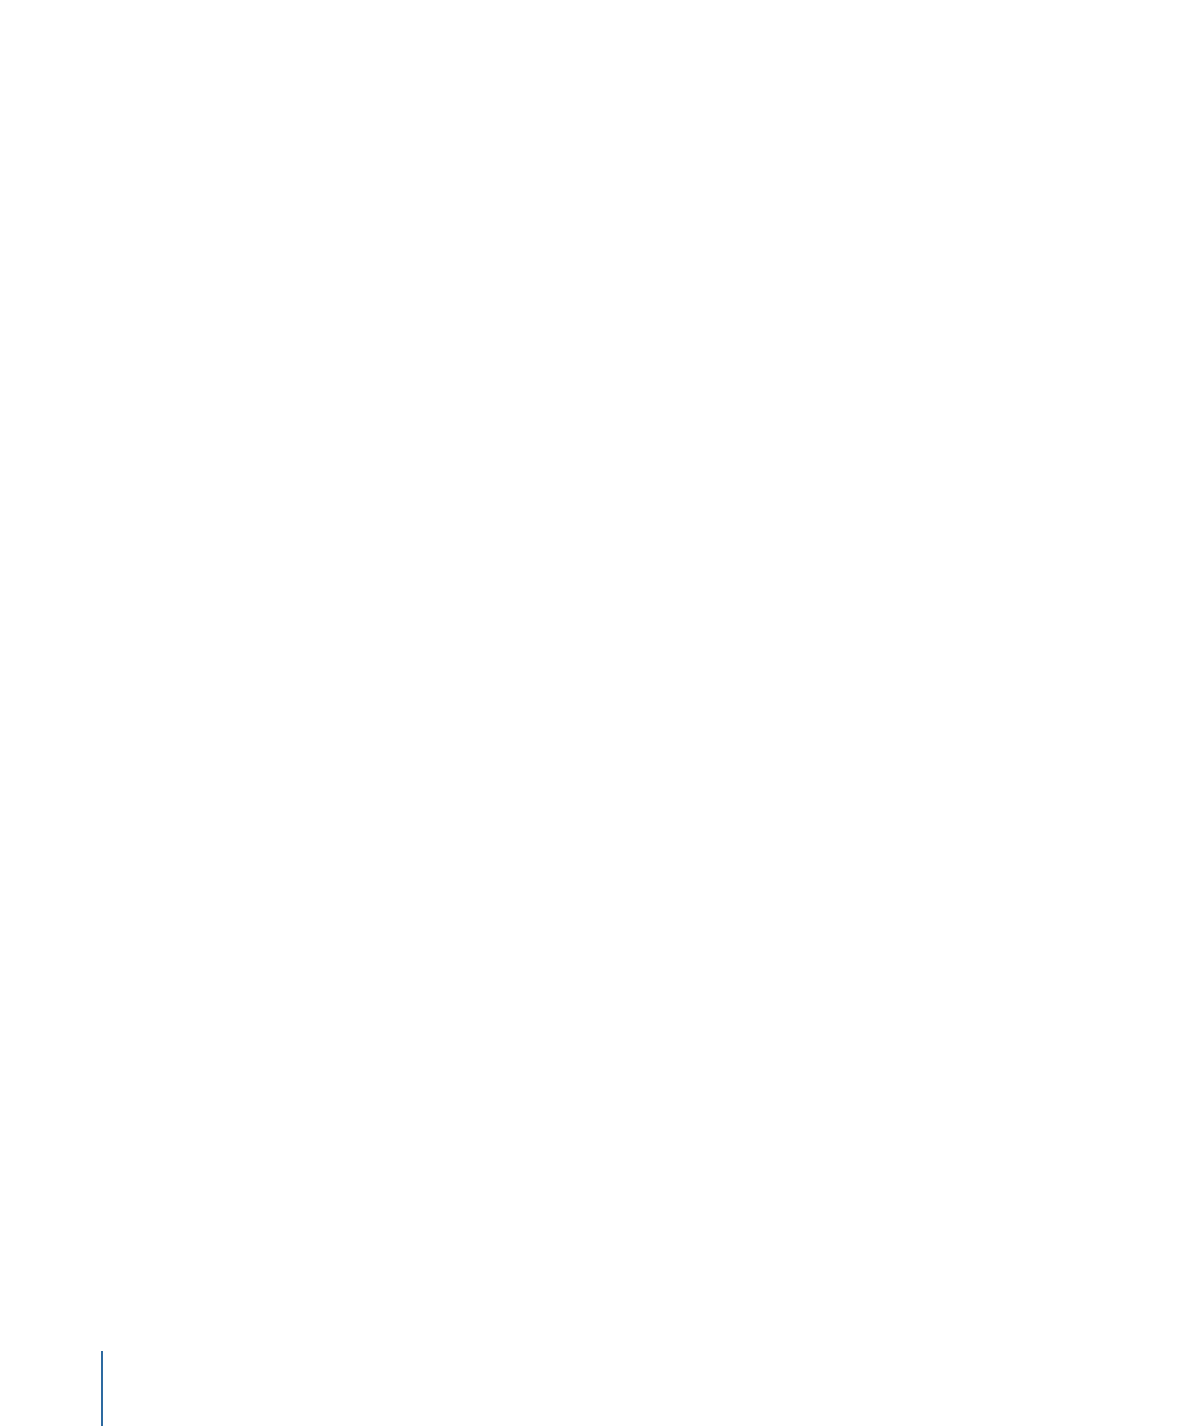
Damping:
When Wave is the defined path shape, this slider progressively diminishes the
oscillation of the wave. Positive damping values diminish the wave forward (from left to
right); negative values diminish the wave backward (from right to left). The following
illustration shows positive damping applied to the wave motion path.
Attach to Shape:
When Geometry is the defined path shape, this checkbox, when
activated, forces the motion path to follow the source shape at its original location. When
disabled, the motion path can exist in a location other than its source shape.
Note: When Attach to Shape is on, you cannot move the object to another location.
Tip: To align the rotation of an object to match all changes made to its position along
an animation path, apply the Snap Alignment to Motion behavior. For more information,
see
Snap Alignment to Motion
.
Shape Source:
When Geometry is the defined path shape, this image well defines the
object (shape or mask) to use as the motion path source.
• To: This pop-up menu, located to the right of the Shape Source image well, displays a
list of all objects in the current project that can be used as a shape source for the motion
path.
Direction:
A pop-up menu that defines the object’s direction over the path. There are
two options:
• Forward: The object moves in a forward direction along the path (from the start point
to the end point, depending upon the Offset parameter).
• Reverse: The object moves in a backward direction along the path (from the end point
to the start point, depending upon the Offset parameter).
Note: The Offset parameter is available when Path Shape is set to Circle or Rectangle.
Speed:
A pop-up menu that defines the object’s velocity from the first to the last point
in the motion path. There are eight choices:
• Constant: The object moves at a steady speed from the first to the last point on the
motion path.
• Ease In: The object starts at a slow speed, then reaches and maintains a steady speed
through the last point on the motion path.
403
Chapter 9
Using Behaviors
• Ease Out: The object starts at a steady speed, then slows down as it gradually decelerates
to a stop at the last point of the motion path.
• Ease Both: The object slowly accelerates from the first point on the motion path, and
then slows down as it gradually decelerates to a stop at the last point of the motion
path.
• Accelerate: The object moves along the path with increasing speed.
• Decelerate: The object moves along the path with decreasing speed.
• Natural: The speed in which the object moves over the path is determined by the
shape of the path. For example, if the path is a U-shape curve, the object moves faster
as it moves toward the low point of the U and slower as it moves up the edges.
• Custom: Custom allows you to define the movement of the object along its path by
setting keyframes for the object’s speed from 0 to 100 percent. In other words, you
determine the position of the object along the path in time.
Custom Speed:
This parameter becomes available when Speed is set to Custom. You
can modify the Custom Speed velocity curve in the Keyframe Editor. You can keyframe
custom values to make an object, for example, travel forward to a specific percentage of
the path, then backward, then forward, and so on before it reaches the end of the
animation.
Apply Speed:
When the Loops parameter is set to a value greater than 1, this pop-up
menu determines how the Speed parameter (velocity) is applied over the duration of the
behavior.
Note: Loops must be set to a value greater than 1 for the Apply Speed parameter to have
any effect.
• Once Per Loop: The velocity, as defined by the Speed parameter, is applied to each
cycle. For example, if Loops is set to 3 and Speed is set to Accelerate, the object
accelerates each time it travels over the path. The speed is applied to the entire duration,
ignoring the Loops setting.
• Over Entire Duration: The velocity, as defined by the Speed parameter, is applied one
time over the duration of the behavior. For example, if Loops is set to 3 and Speed is
set to Accelerate, the object accelerates the first time it travels over the path, but not
the second and third time.
Loops:
Determines the number of times the object travels the motion path over the
duration of the behavior. For an object to travel its path more than once, or to “ping
pong,” Loops must be set to a value greater than 1.
End Condition:
A pop-up menu that defines the behavior of the object after it reaches
the end of its motion path. There are two options:
• Repeat: The object travels the motion path the number of times defined by the Loop
parameter.
404
Chapter 9
Using Behaviors
• Ping-Pong: The object moves along the path until it reaches the last point on the path,
then it moves backward to the first point on the path. The number of “ping pongs” is
defined by the Loops parameter.
Control Points:
This parameter becomes available when the path shape is Open Spline
or Closed Spline. Click the disclosure triangle to display the Position parameters for the
motion path control points. The first value field is X, the second value field is Y, and the
third value field is Z.
Note: You cannot apply Parameter behaviors to the control points.
HUD Controls
In the HUD, the following controls are always available: Path Shape, Shape Type, Direction,
Speed, Custom Speed, Apply Speed (sets the number of times the object travels the path
over the object’s duration), and End Condition. Other parameters become available
depending on what is selected from the Path Shape parameter.
Related Behaviors
•
Gravity
•
Random Motion
•
Throw
•
Wind