Canvas View Options
This section discusses how to view the Canvas using the view options pop-up menus in
the top-right corner of the Canvas.
Zoom Level pop-up menu:
The Zoom Level pop-up menu offers several default zoom
levels. Zooming the Canvas does not change the size of the images in your project. It
changes the current view of the window.
You can set the view to percentages of 12, 25, 50, 100, 200, 400, 800, or 1600, or to Fit In
Window.
For more information on zooming in and out of the Canvas, see
Canvas Zoom Level
.
58
Chapter 2
The Motion Interface

Channels pop-up menu (unlabeled):
The Channels pop-up menu (the color spectrum
icon) controls which color channels are displayed in the Canvas. Use this menu to view
a single color channel in the Canvas, to examine layers’ alpha channels, or to manipulate
effects that affect only a single color channel. This menu has the following options:
• Color: Shows the image as it would appear on a video monitor. Visible layers appear
in natural color and transparent areas reveal the background color as set in the
Properties Inspector for the project. The background color is black by default. To change
it, press Command-J, then choose a color from the Background Color control in the
Properties Inspector.
Note: The Background pop-up menu in the Properties Inspector must be set to Solid
to export the background color with the project. This option creates a solid alpha
channel on export (when exporting using a codec that supports alpha channels). When
the Background pop-up menu is set to Transparent, the color is visible in the Canvas,
but does not render as part of the alpha channel.
• Transparent: Shows the background area of the Canvas as transparent. A checkerboard
pattern appears by default where no images block the background.
• Alpha Overlay: Displays the image in normal color, but adds a red highlight over
transparent areas of the image.
• RGB Only: Displays the normal mix of red, green, and blue channels but displays
transparent areas (including semitransparent areas) as opaque.
• Red: Displays only the red channel as a range of black to white.
• Green: Displays only the green channel as a range of black to white.
• Blue: Displays only the blue channel as a range of black to white.
• Alpha: Displays the alpha (transparency) channel of the layers in the Canvas.
• Inverted Alpha: Displays an inverted view of the alpha (transparency) channel.
Render pop-up menu:
The Render pop-up menu controls the quality and resolution of
the Canvas display and lets you enable or disable features that can impact playback
performance. When an option is active, a checkmark appears beside the menu item.
If a complex project is causing your computer to play at a very low frame rate, you can
make changes in this menu to reduce the strain on the processor. This frees you from
waiting for the image to be rendered at full resolution each time you make an adjustment,
allowing you to watch complex projects at high frame rates while you work.
Note: These options are also available in the View pull-down menu (View > Resolution,
Quality, or Render Options).
59
Chapter 2
The Motion Interface

The Render pop-up menu displays the following options:
• Dynamic: Reduces the quality of the image displayed in the Canvas during playback
or scrubbing in the Timeline or mini-Timeline, allowing for faster feedback. Also reduces
the quality of an image as it is modified in the Canvas. When playback or scrubbing is
stopped, or the modification is completed in the Canvas, the image quality is restored
(based on the Quality and Resolution settings for the project).
• Full: Displays the Canvas at full resolution (Shift-Q).
• Half: Displays the Canvas at half resolution.
• Quarter: Displays the Canvas at one-quarter resolution.
• Draft: Renders objects in the Canvas at a lower quality to allow optimal project
interactivity. There is no antialiasing.
• Normal: Renders objects in the Canvas at a medium quality. Shapes are antialiased,
but 3D intersections are not. Floating point (32-bit) footage is truncated to 16-bit. This
is the default setting.
• Best: Renders objects in the Canvas at best quality, which includes higher-quality image
resampling, antialiased intersections, antialiased particle edges, and sharper text.
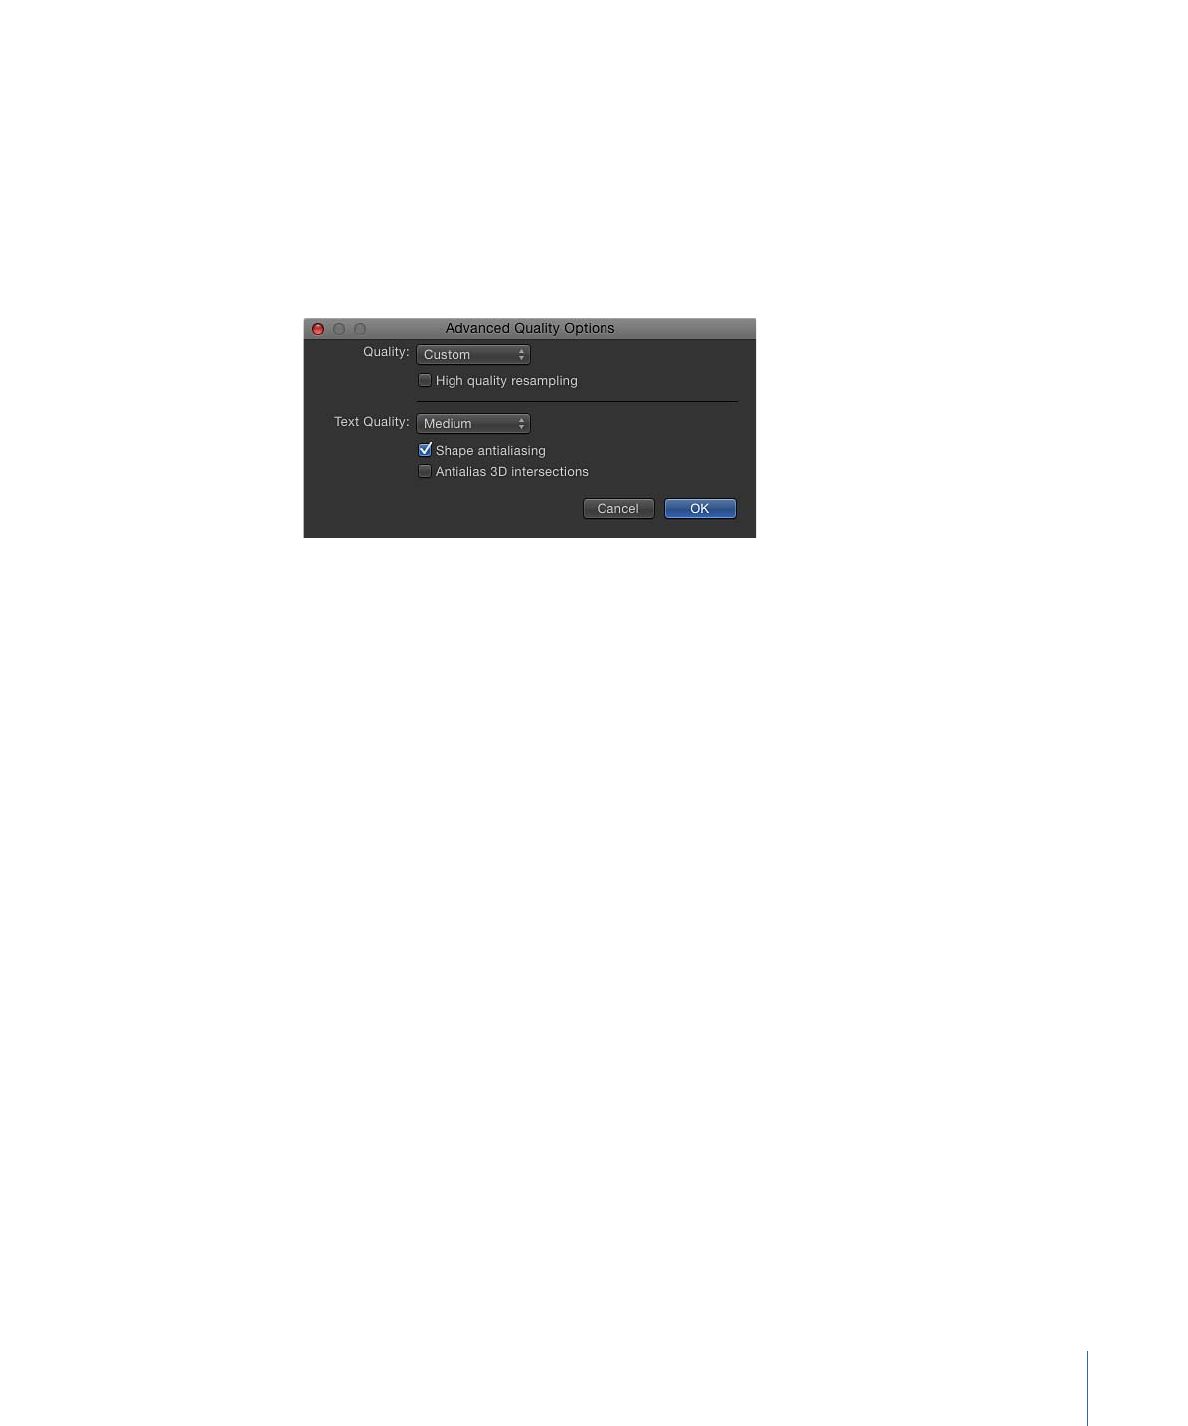
• Custom: Allows you to set additional controls to customize render quality. Choosing
Custom opens the Advanced Quality Options dialog. For information on the settings
in the Advanced Quality Options dialog, see
Advanced Quality Settings
.
• Lighting: Turns the effect of lights in a project on or off. This setting does not turn off
lights in the Layers list (or light scene icons), but it disables light shading effects in the
Canvas.
• Shadows: Turns the effect of shadows in a project on or off.
• Reflections: Turns the effect of reflections in a project on or off.
• Depth of Field: Turns the effect of depth of field in a project on or off.
• Motion Blur: Enables/disables the preview of motion blur in the Canvas. Disabling
motion blur can result in a performance improvement.
Note: When creating an effect, title, transition, or generator template for use in
Final Cut Pro X, the Motion Blur item in the View pop-up menu controls whether motion
blur is turned on when the project is applied in Final Cut Pro.
• Field Rendering: Enables/disables field rendering. Field rendering is required for smooth
motion playback on many TV monitors. Field rendering nearly doubles rendering time,
so disabling this item can improve performance.
60
Chapter 2
The Motion Interface

Note: When creating an effect, title, transition, or generator template for use in
Final Cut Pro, the Field Rendering setting in the View pop-up menu does not control
whether field rendering is applied in Final Cut Pro. Rather, field rendering is controlled
in the Properties Inspector for the project. (Press Command-J to open the Properties
Inspector.) When Field Order is set to anything other than None, field rendering is used
in Final Cut Pro, regardless of the Field Rendering status in the View pop-up menu.
• Frame Blending: Enables/disables frame blending in the Canvas. Frame blending can
smooth the appearance of video frames by interpolating the pixels between adjacent
frames to create a smoother transition.
View and Overlay pop-up menu:
The View and Overlay pop-up menu provides access
to the guides and controls that can be viewed in the Canvas. When an option is active,
a checkmark appears beside the menu item.
Note: Many of these options are also available in the View pull-down menu.
The View and Overlay pop-up menu displays the following options:
• Show Overlays: Turns the display of overlays in the Canvas on or off. This setting must
be on to view any other overlay items (grids, guides, and so on). To turn the camera
overlays on or off, use Show 3D Overlays.
Note: You can also press Command-Slash (/).
• Rulers: Turns display of the rulers along the edge of the Canvas on or off. You can
specify where the rulers appear in the Canvas section (Alignment) of Motion Preferences.
For more information on using rulers, see
Canvas Rulers
.
Note: You can also press Command-Shift-R.
• Grid: Turns a grid display on and off over the Canvas. You can set the spacing and color
of the grid in the Canvas section (Alignment) of Motion Preferences.
Note: You can also press Command-Apostrophe (’).
• Guides: Turns display of manually created guides on and off. Guides can only be created
if rulers are displayed. You can change the color of the guides in the Canvas pane
(Alignment) of Motion Preferences.
Note: You can also press Command-Semicolon (;).
• Dynamic Guides: Turns display of automatic dynamic guides on and off. These guides
appear when dragging a layer past edges of other layers when snapping is enabled
(choose View > Snap). You can change the color of dynamic guides in the Canvas pane
(Alignment) of Motion Preferences.
Note: You can also press Command-Shift-Colon (:).
• Safe Zones: Turns display of the title safe and action safe guides on and off. By default,
these guides are set at 80% and 90%. You can change these settings and the color of
the guides in the Canvas pane (Zones) of Motion Preferences.
Note: You can also press the Apostrophe key (’).
61
Chapter 2
The Motion Interface
• Film Zone: Turns display of film aspect ratio guides on and off. This can be helpful if
you are creating a project for videotape to be transferred to film. You can change the
size of the guides as well as their color in the Canvas pane (Zones) of Motion Preferences.
Note: You can also press Shift-Quotation Mark (”).
• Handles: Turns display of object handles in the Canvas on and off. Some onscreen
transformations, such as resizing, require visible object handles. Handles appear only
on selected objects.
• Lines: Turns display of lines that outline an object on and off. Lines only appear on
selected objects.
• Animation Path: Turns animation paths on and off. These editable paths indicate the
route along which animated objects travel. If the selected object is not positionally
animated, this command does not appear to have any effect. If handles are not
displayed, the path curves cannot be adjusted in the Canvas. Except for the Motion
Path behavior, animation paths created by behaviors are for display only and are not
editable.
• Show 3D Overlays: Turns 3D overlays in the Canvas on and off, including Camera overlays,
3D View Tools, Compass, Inset View, 3D grid, and 3D scene icons. (3D overlays appear
in projects that contain 3D groups.)
Note: You can also press Command-Option-Slash (/).
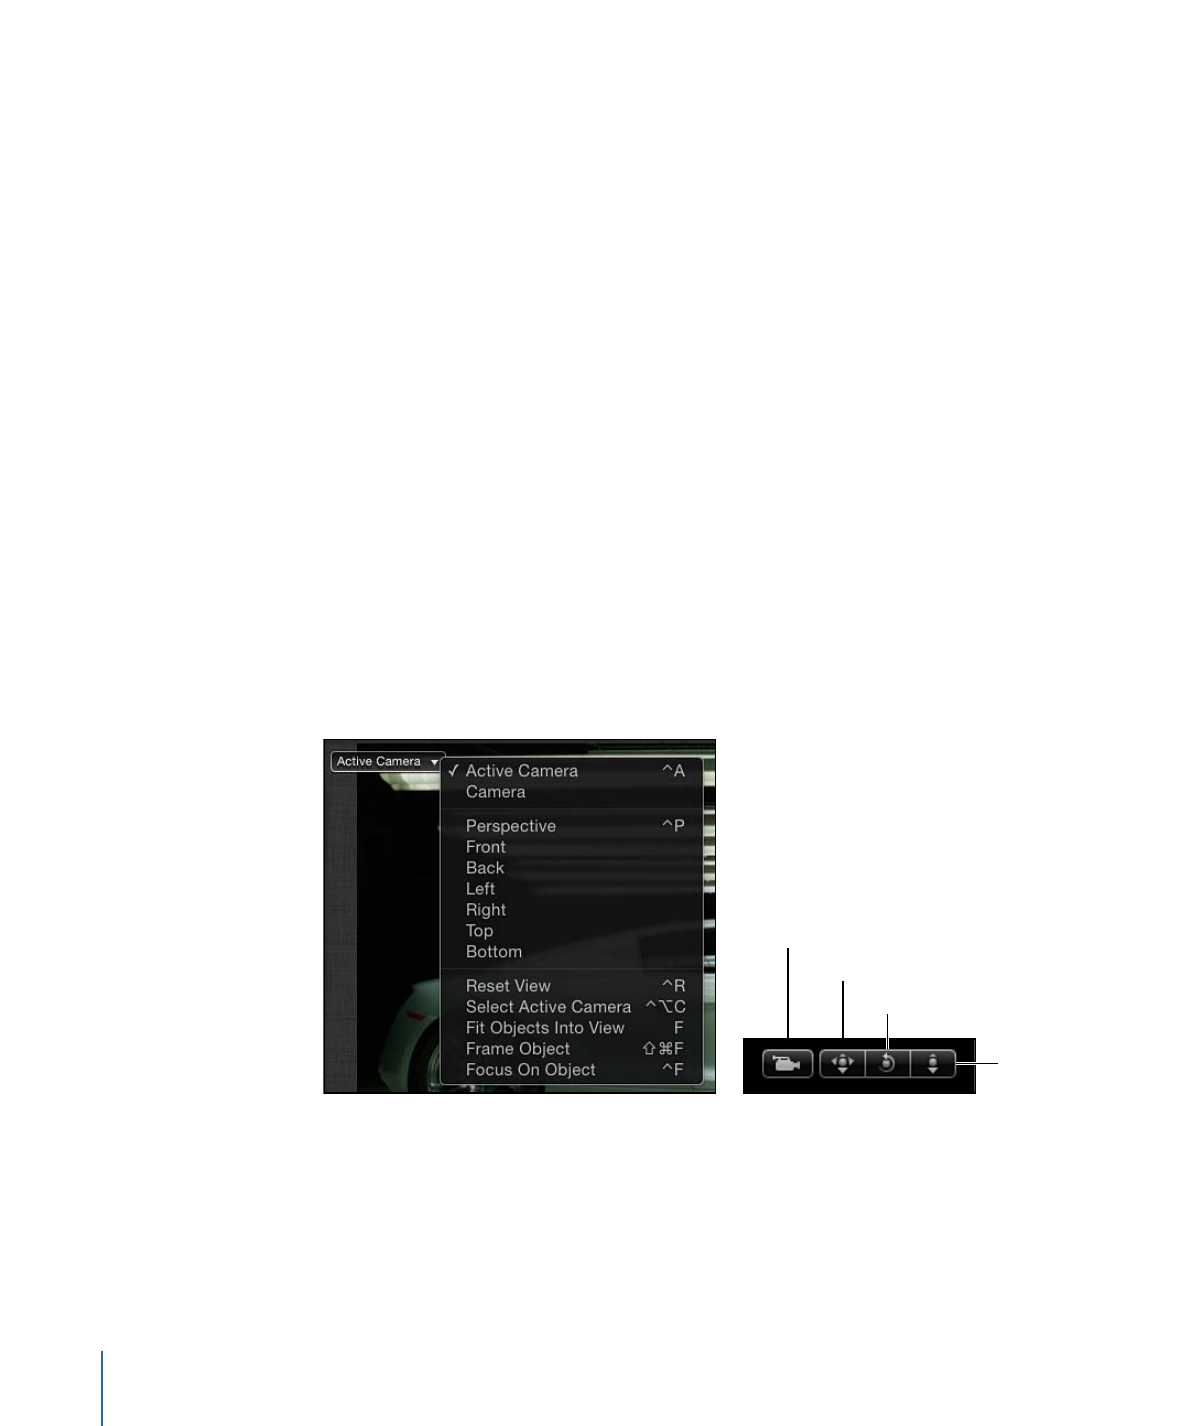
• 3D View Tools: Turns the Camera menu and 3D View tools in the Canvas on and off.
3D View tools
Camera menu
Scene camera
Pan
Dolly
Orbit
• Compass: Turns the 3D Compass in the Canvas on and off. Using red, green, and blue
axes, the compass shows your current orientation in 3D space. The red axis is X
(horizontal), the green axis is Y (vertical), and the blue axis is Z (depth).
62
Chapter 2
The Motion Interface
Holding the pointer over the 3D Compass exposes color-coded shortcuts to the reference
camera views. Click any colored view icon, such as Front, Left, Right, Perspective, and
so on to switch to a different camera view. The Canvas animates as it changes view.
For more information on working with the 3D Compass and different views, see
Views
.
3D Compass
3D Compass showing
camera shortcuts
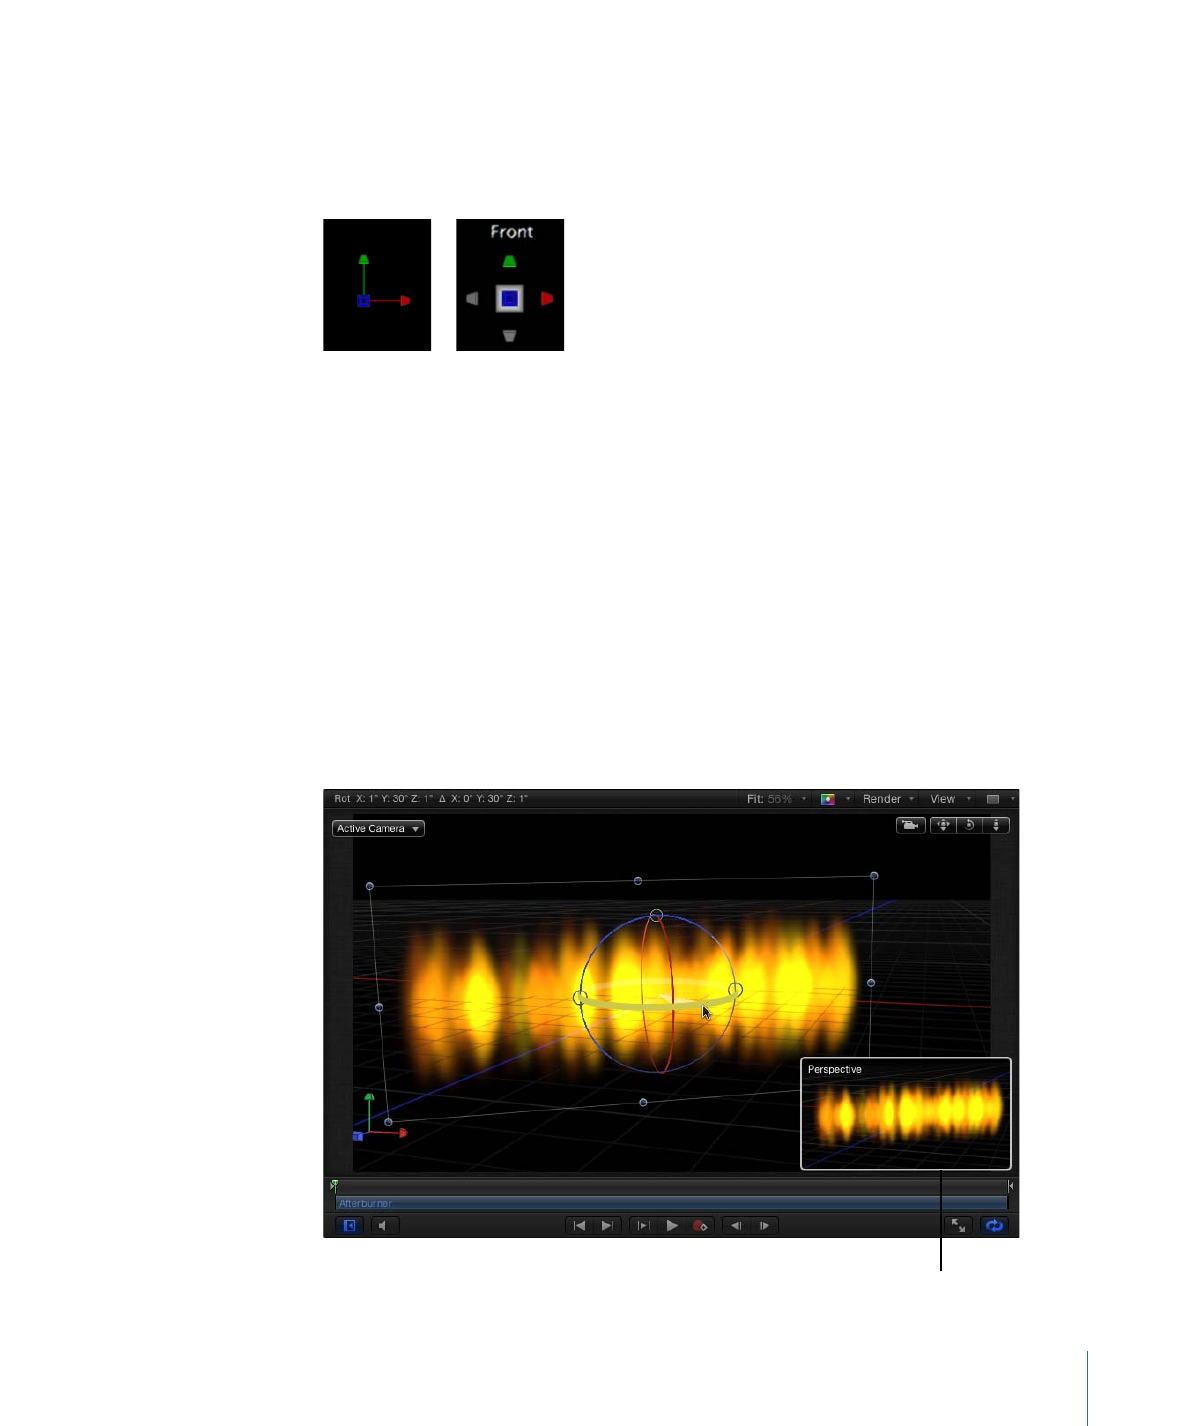
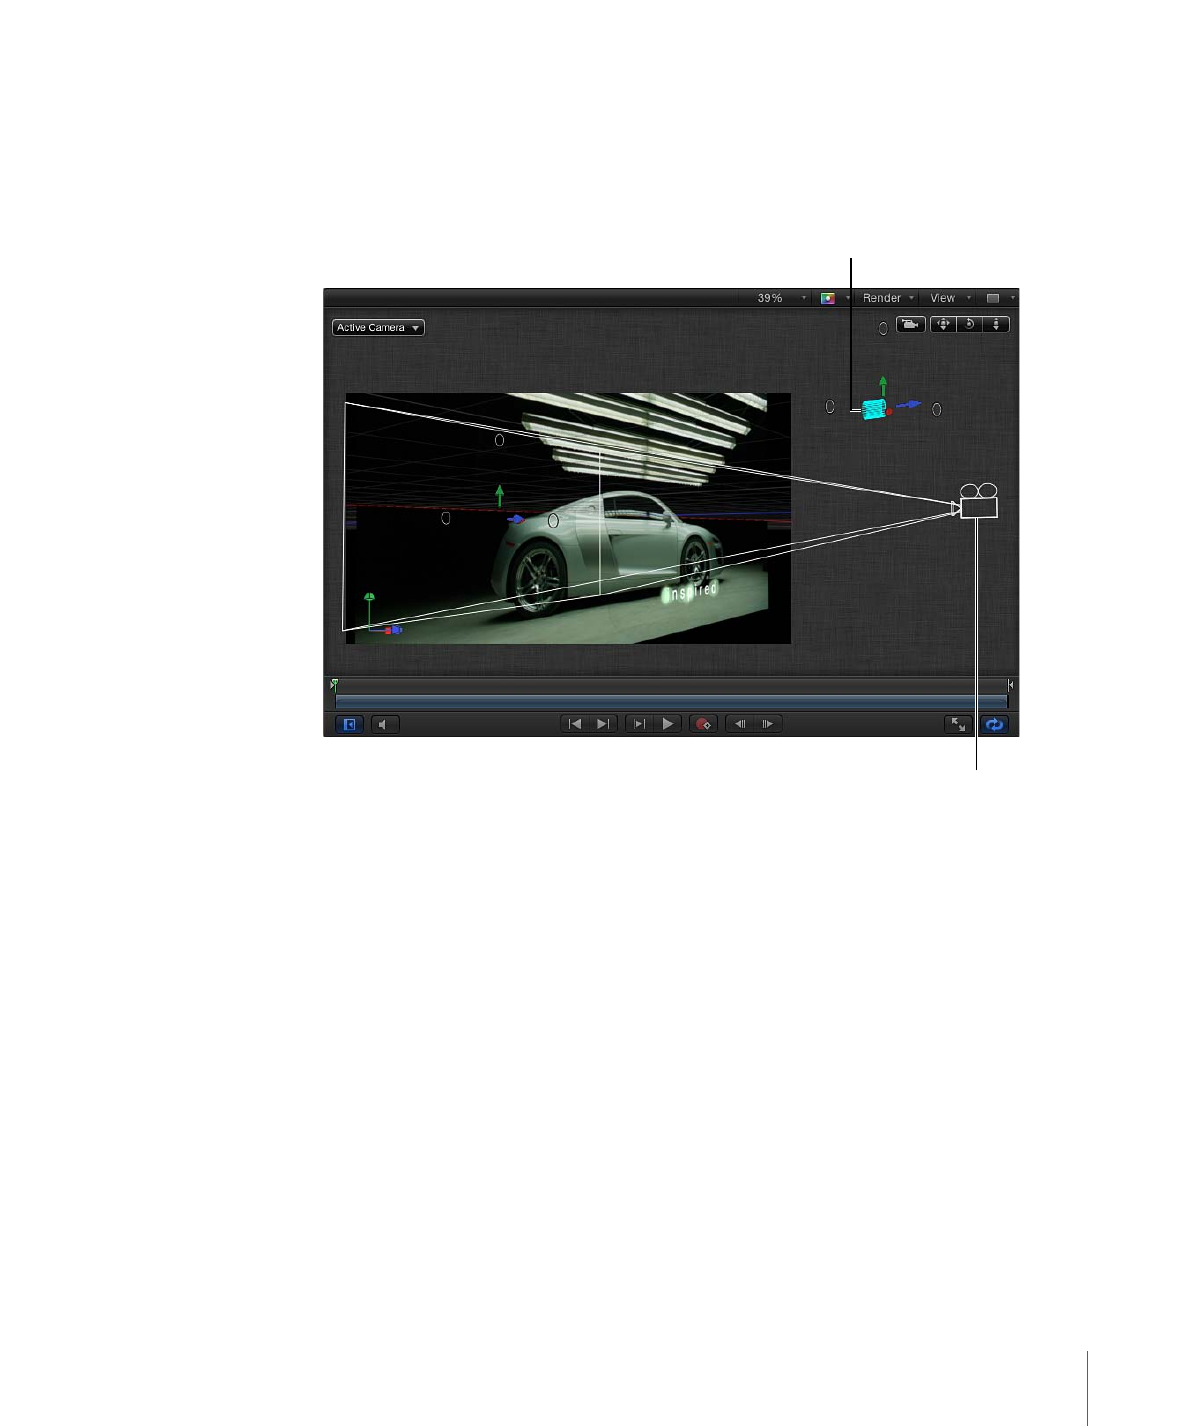
• Inset View: Turns the Inset view in the Canvas on and off. When enabled, a temporary
window appears in the lower-right corner of the Canvas displaying an Active Camera
or Perspective view of the project, helping you stay oriented as you move objects in
3D space. In the 3D pane of Motion Preferences, you can change the size of the Inset
view, as well as control whether the Inset view appears on transform changes, on all
changes, or manually.
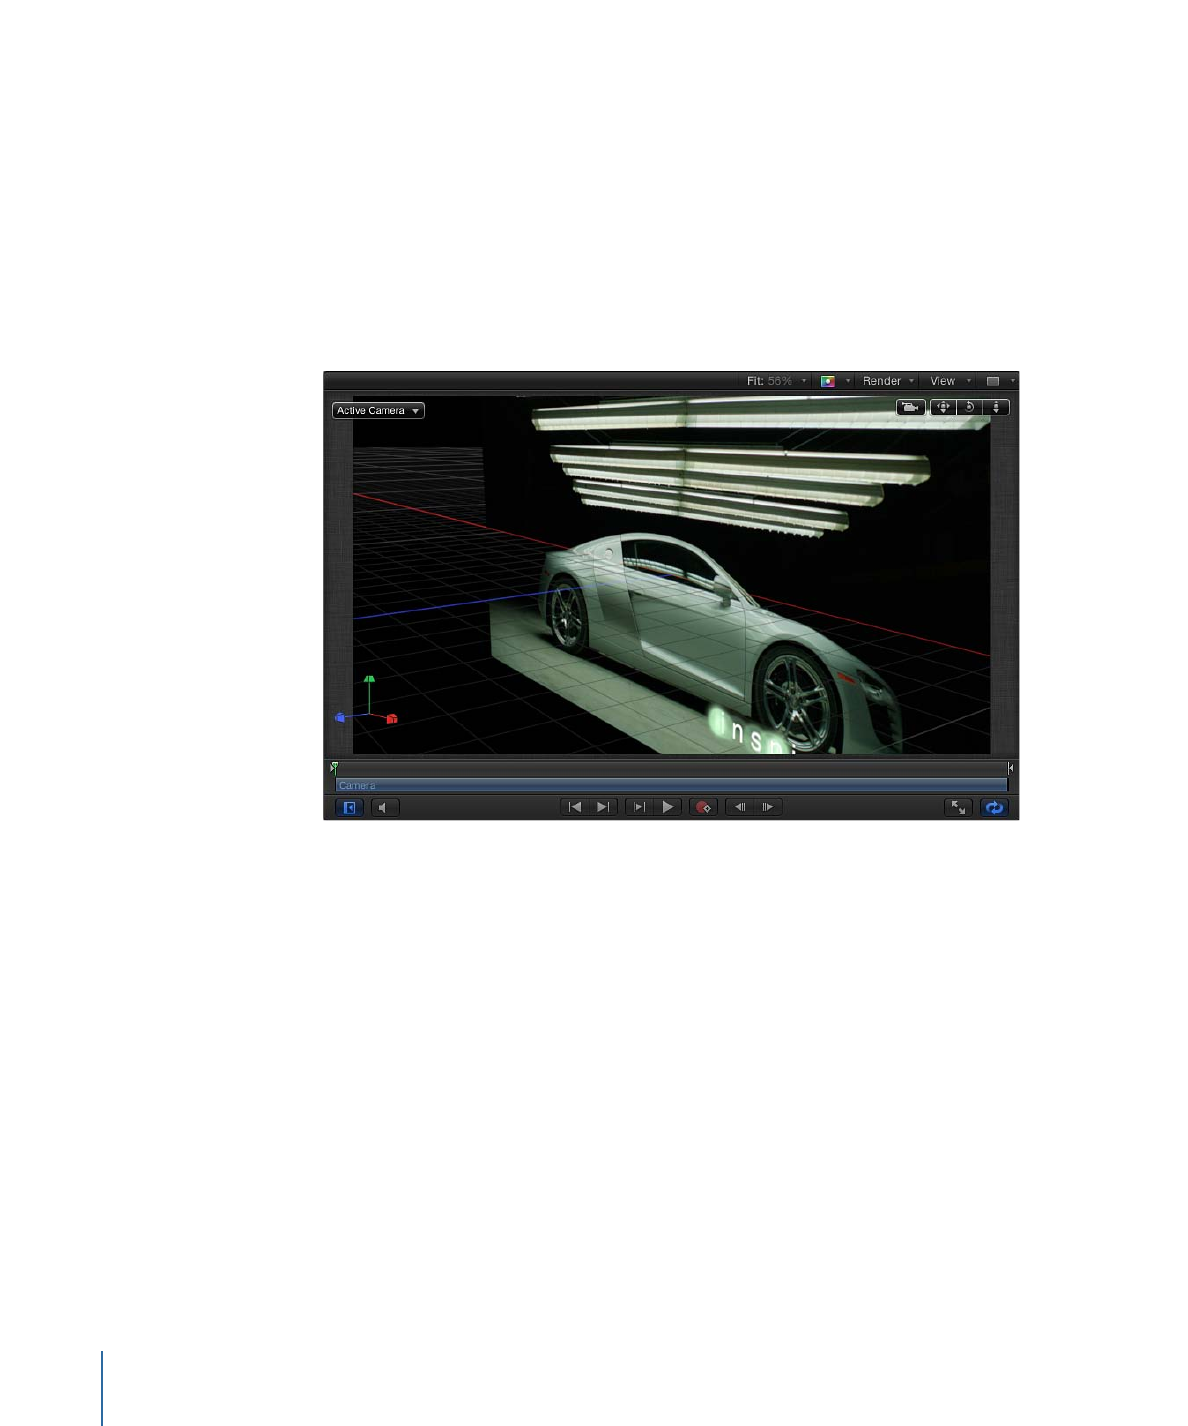
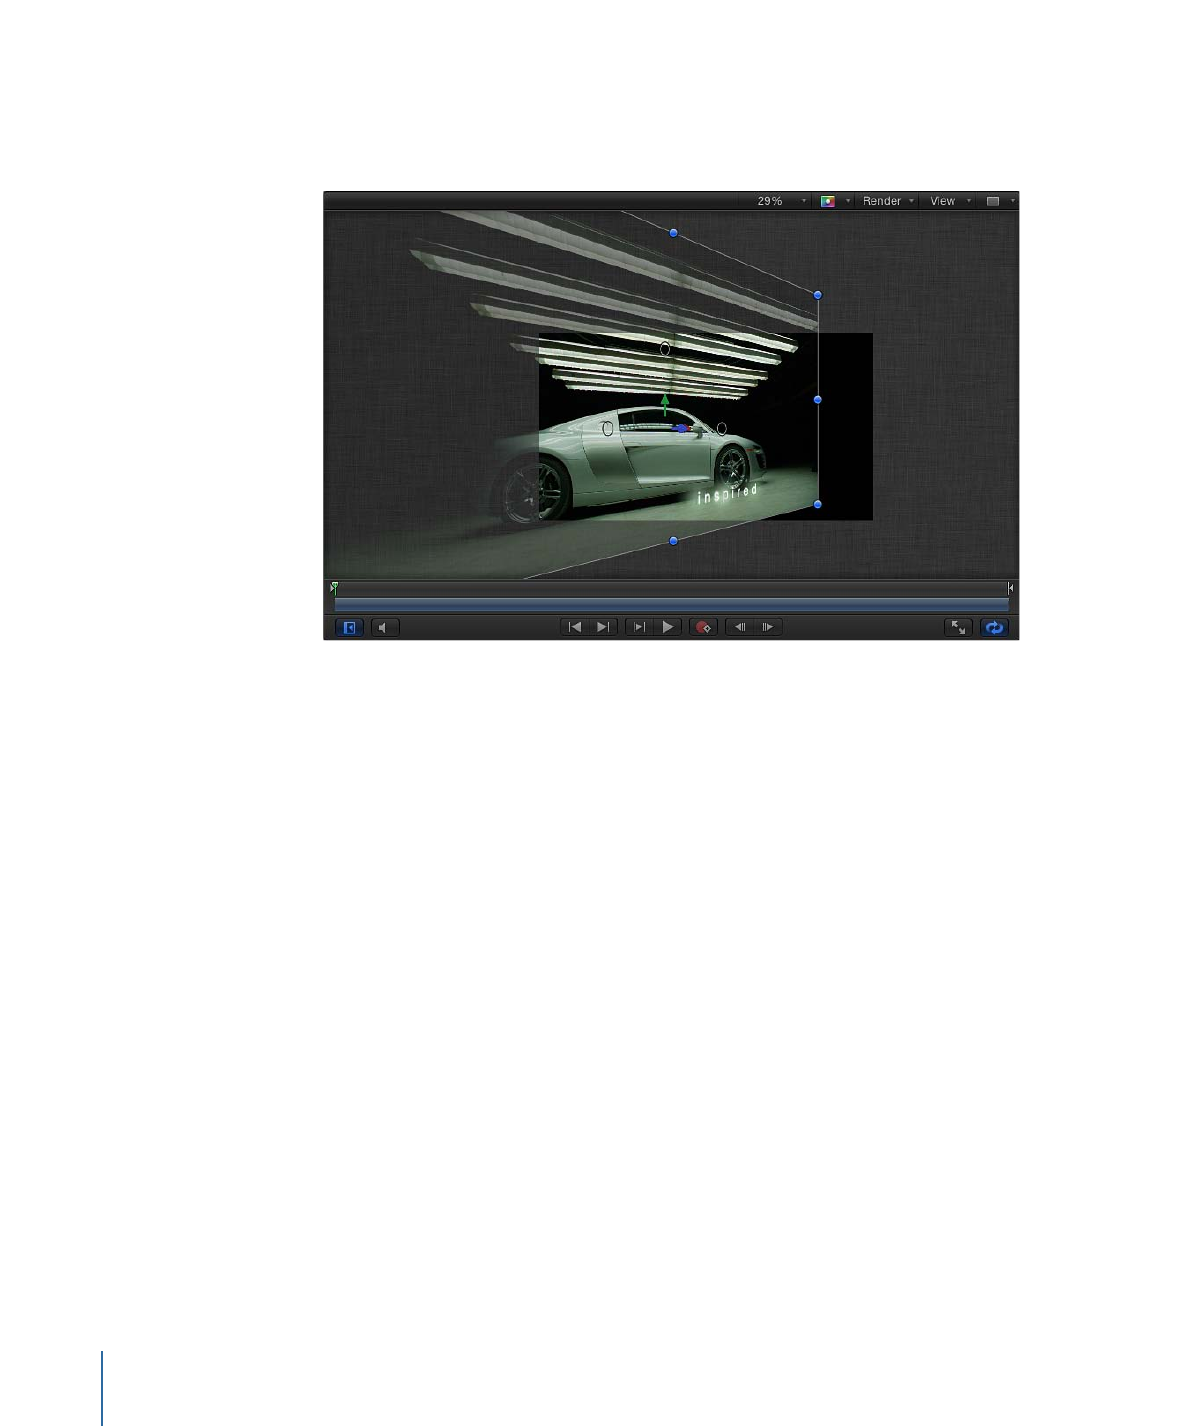
The Perspective view changes to fit the objects in the Inset view (even if objects are
no longer visible in the main window). This view is triggered when you are looking
through the camera. The Active view is triggered when you use a camera view other
than the active camera (such as Front). For more information on the Inset view, see
Inset View
.
Inset view
63
Chapter 2
The Motion Interface
Note: Because project elements are 2D (flat) objects, the elements are not visible when
you use orthogonal camera views (Left, Right, Top, and Bottom) unless the elements
are rotated in 3D space (or unless text, particles, or the replicator is using the Face
Camera parameter in its Inspector). This is because orthogonal views are at right angles
(perpendicular) to the elements. When an object is selected, a thin gray line represents
the object in the Canvas. For more information on using cameras, see
Cameras
.
• 3D Grid: Turns the grid in the Canvas on and off. The 3D grid helps you stay oriented
and can be used to guide the placement of objects in your project. The 3D grid appears
when you are in a 3D workspace.
64
Chapter 2
The Motion Interface
• 3D Scene Icons: Turns the display of cameras and lights in the Canvas on or off. Scene
icons appear in the Canvas as wireframe icons. Lights appear with red (X), green (Y),
and blue (Z) adjust 3D handles that let you transform and rotate them. The handles
are still displayed when the 3D Scene Icons command is turned off. For more information
on the 3D scene icons, see
3D Scene Icons
.
Camera
Light
• Correct for Aspect Ratio: Applies an artificial distortion of the Canvas in projects with
nonsquare pixels. When the setting is on, the computer monitor simulates what a TV
monitor displays. When the setting is off, projects with nonsquare pixels appear
stretched. This is because computer monitors have square pixels. This setting does not
modify the output of the project.
65
Chapter 2
The Motion Interface
• Show Full View Area: When enabled, this setting lets you see the portion of a layer that
extends beyond the edge of the Canvas. This setting is disabled by default, because it
slows your project’s interactivity.
• Use Drop Zones: Turns drop zones on and off. When turned on, a checkmark appears
next to the menu item, and drop zones accept objects dragged to them. When turned
off, drop zones ignore objects dropped onto them. For more information on using drop
zones, see
Drop Zones
.
• Save View Defaults: Saves the current state of all settings in this menu as the default
state for new projects.
View Layouts pop-up menu:
The View Layouts pop-up menu lets you specify how to
view your project in the Canvas. You can view the Canvas as a single workspace or choose
from available window arrangements in the menu.
Note: Although the workspace views are available for 2D projects, they are most useful
when working in 3D space.
• Single: The default value, displays a single window in the Canvas.
• Two-up, side by side: Displays two windows in the Canvas, one next to the other.
• Two-up, top and bottom: Displays two windows in the Canvas, one on top of the other.
• Three-up, large window below: Displays three windows, two next to each other on top
and a larger window below.
• Three-up, large window right: Displays three windows, two stacked on the left side and
a larger window spanning the right side.
66
Chapter 2
The Motion Interface
• Four-up, large window right: Displays four windows, three stacked on the left side and
one larger window on the right side.
• Four-up: Displays four windows, all the same size.