
Advanced Example: Creating an SLR Effect Template Using
Rigging
Advanced Motion users can create sophisticated effects templates for Final Cut Pro X.
The following example describes how to create one such effect, a simulation of an SLR
(single-lens reflex) camera viewfinder changing focus. An SLR camera uses a moving
prism-and-mirror system to show the photographer the image that will be captured on
film. This workflow in this section requires a thorough knowledge of several advanced
Motion techniques, including clones, masks, and rigging. For more information on the
these techniques, see
Making Clone Layers
,
Using Shapes, Masks, and Paint Strokes
, and
Using Rigs
. The workflow in this example is divided into the following tasks:
• Setting up the template project in Motion
• Creating the "viewfinder" graphics
• Adding a preview image
• Adding masks
• Creating and customizing a new rig
• Publishing the rig widget and effect template to Final Cut Pro
To set up the SLR effect project in Motion
1
Choose File > New (or press Command-N).
2
In the Project Browser, select Final Cut Effect, choose the project preset required for your
Final Cut Pro X project, then click Open.
Note: This example uses the Broadcast HD 720 preset.
512
Chapter 11
Creating Templates for Final Cut Pro X
The project opens and contains a single group with one Effect Source placeholder layer.
The placeholder (the arrow image) represents the clip or image to which the effect will
be applied in the Final Cut Pro Timeline. Because this template uses multiple instances
of the same image or clip to create an SLR split-prism effect, clones are made of the
placeholder.
3
Clone the placeholder:
a
Select the Effect Source layer, then choose Object > Make Clone Layer (or press K).
b
Rename the Clone Layer “Background.”
c
Select the Effect Source layer again, then choose Object > Make Clone Layer (or press
K).
d
Rename the second Clone Layer “Top Prism.”
e
Rename the Effect Source layer “Bottom Prism.”
4
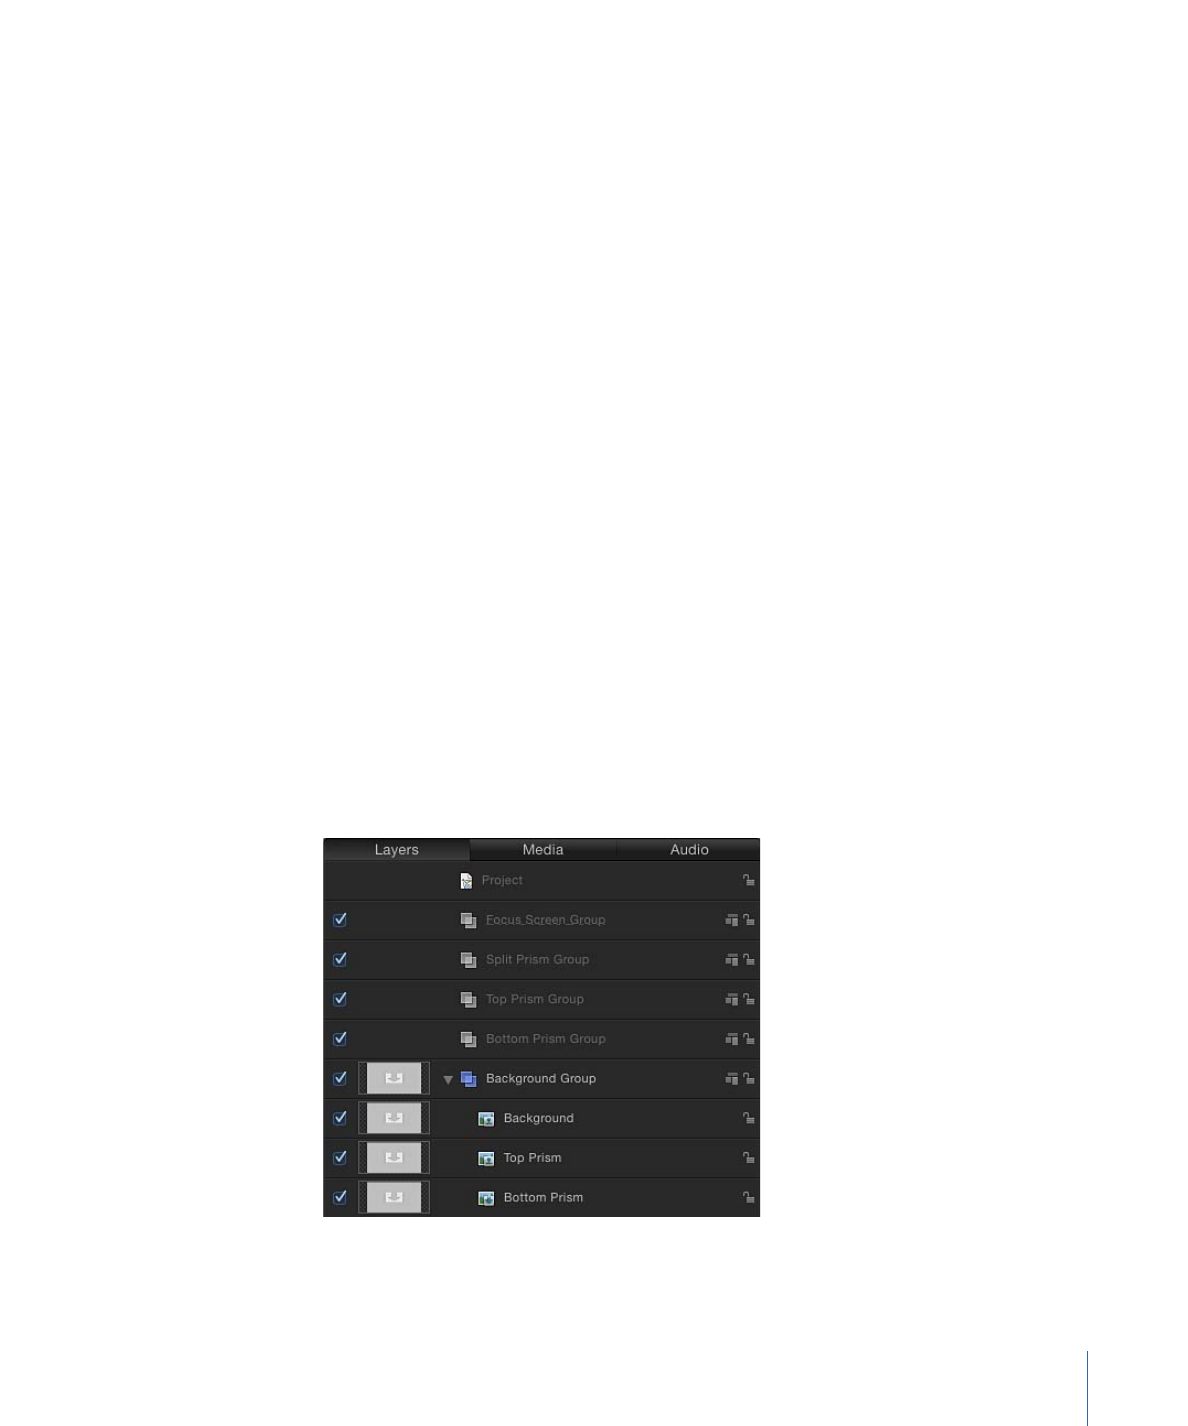
Add new groups to the project:
a
In the Layers list, select the Group, then click the Add button (+) in the lower-left corner
of the Layers list four times to create four additional groups.
b
Name the bottommost Group (the one containing the clones) “Background Group.”
c
Name Group 1 “Bottom Prism Group.”
d
Name Group 2 “Top Prism Group.”
e
Name Group 3 “Split Prism Group.”
f
Name Group 4 “Focus Screen Group.”
Your project should look like the following illustration:
513
Chapter 11
Creating Templates for Final Cut Pro X
5
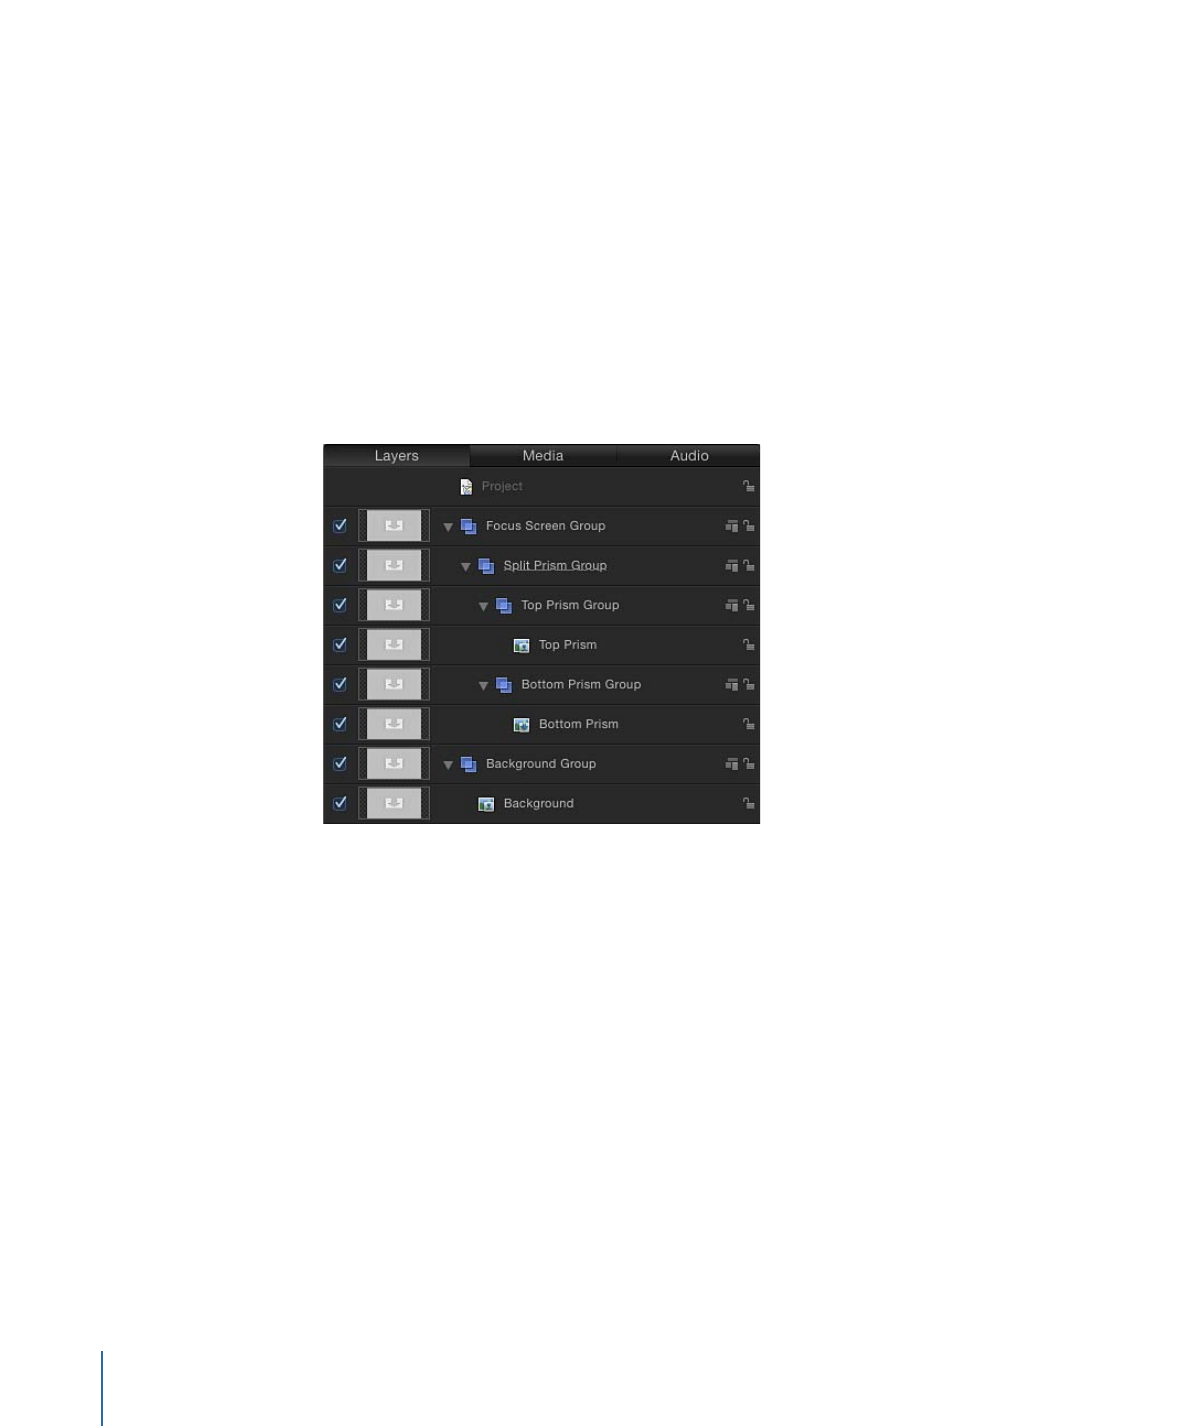
Organize the groups and placeholder clones:
a
Drag the Bottom Prism clone layer to the Bottom Prism Group. When the highlight
appears around the Bottom Prism Group, release the mouse button.
b
Drag the Top Prism clone layer to the Top Prism Group.
c
Shift-select the Bottom Prism Group and the Top Prism Group, then drag them to the
Split Prism Group.
The Bottom Prism Group and the Top Prism Group are now members of the Split Prism
Group.
d
Drag the Split Prism Group to the Focus Screen Group.
Your project should look like the following illustration:
In the next task, add shapes to simulate the focus rings found in an SLR viewfinder.
To add the viewfinder focus graphics
1
With the Focus Screen group selected, choose the Circle tool from the Shape pop-up
menu in the Toolbar.
2
Position the pointer in the center of the Canvas and , holding down the Shift and Option
keys, draw a circle in the Canvas.
The circle should be large enough to cover the arrow graphic.
Tip: Choose Grid from the View pop-up menu above the Canvas to display a grid to assist
in the positioning of graphics in the Canvas.
3
Name the circle layer “Outer Ring.”
4
With the Outer Ring layer selected, do the following in the Shape Inspector:
a
Turn off Fill by deselecting the blue activation box.
b
Turn on Outline by selecting the blue activation box.
514
Chapter 11
Creating Templates for Final Cut Pro X

c
Set Brush Color to black.
d
Set Width to 1.
e
Set Brush Opacity to 80 percent.
5
With the Outer Ring layer selected, press Command-D, then name the duplicated shape
“Texture Ring.”
6
In the Shape Inspector, do the following:
a
Turn off Outline by deselecting the blue activation box.
b
Turn on Fill by selecting the blue activation box.
c
Set Fill Color to black.
d
Set Fill Opacity to 35 percent.
7
In the Properties Inspector, set Scale to 42 percent.
8
In the toolbar, choose Stylize > Halftone from the Add Filter pop-up menu.
A screen pattern is applied to the Texture Ring.
9
In the Filter Inspector, set Contrast to 0.2.
In the next task, add an image (to assist in seeing the effect you are building) and apply
a blur filter. In a later task, you will rig the blur filter to create the changing focus effect.
Add an image and apply a blur filter to the background
1
In the File Browser, drag a still image to the Canvas, releasing the mouse button when
the placeholder in the Canvas is highlighted yellow.
515
Chapter 11
Creating Templates for Final Cut Pro X

This image will allow you to see the effect you are building. When the image is dragged
to the Canvas, it is applied to the clone and background layers. This example uses an
image of a herd of elephants. They’re neat.
2
In the Layers list, select the Background layer.
3
In the toolbar, choose Blur > Gaussian Blur from the Add Filter pop-up menu.
A Gaussian Blur filter is added to the elephant image.
4
In the Filters Inspector, set Amount to 0.
The blur amount will be modified in a subsequent step (when you build the rig).
In the next task, you will add the masks that create the center of the viewfinder and the
split prisms.
To add the focus screen masks
1
Add a mask to the Texture Ring layer:
a
In the Layers list, select the Texture Ring layer.
b
Choose the Circle Mask tool from the Mask pop-up menu in the toolbar, position the
pointer in the center of the Texture Ring shape and, holding down the Shift and Option
keys, draw a mask in the Canvas.
516
Chapter 11
Creating Templates for Final Cut Pro X
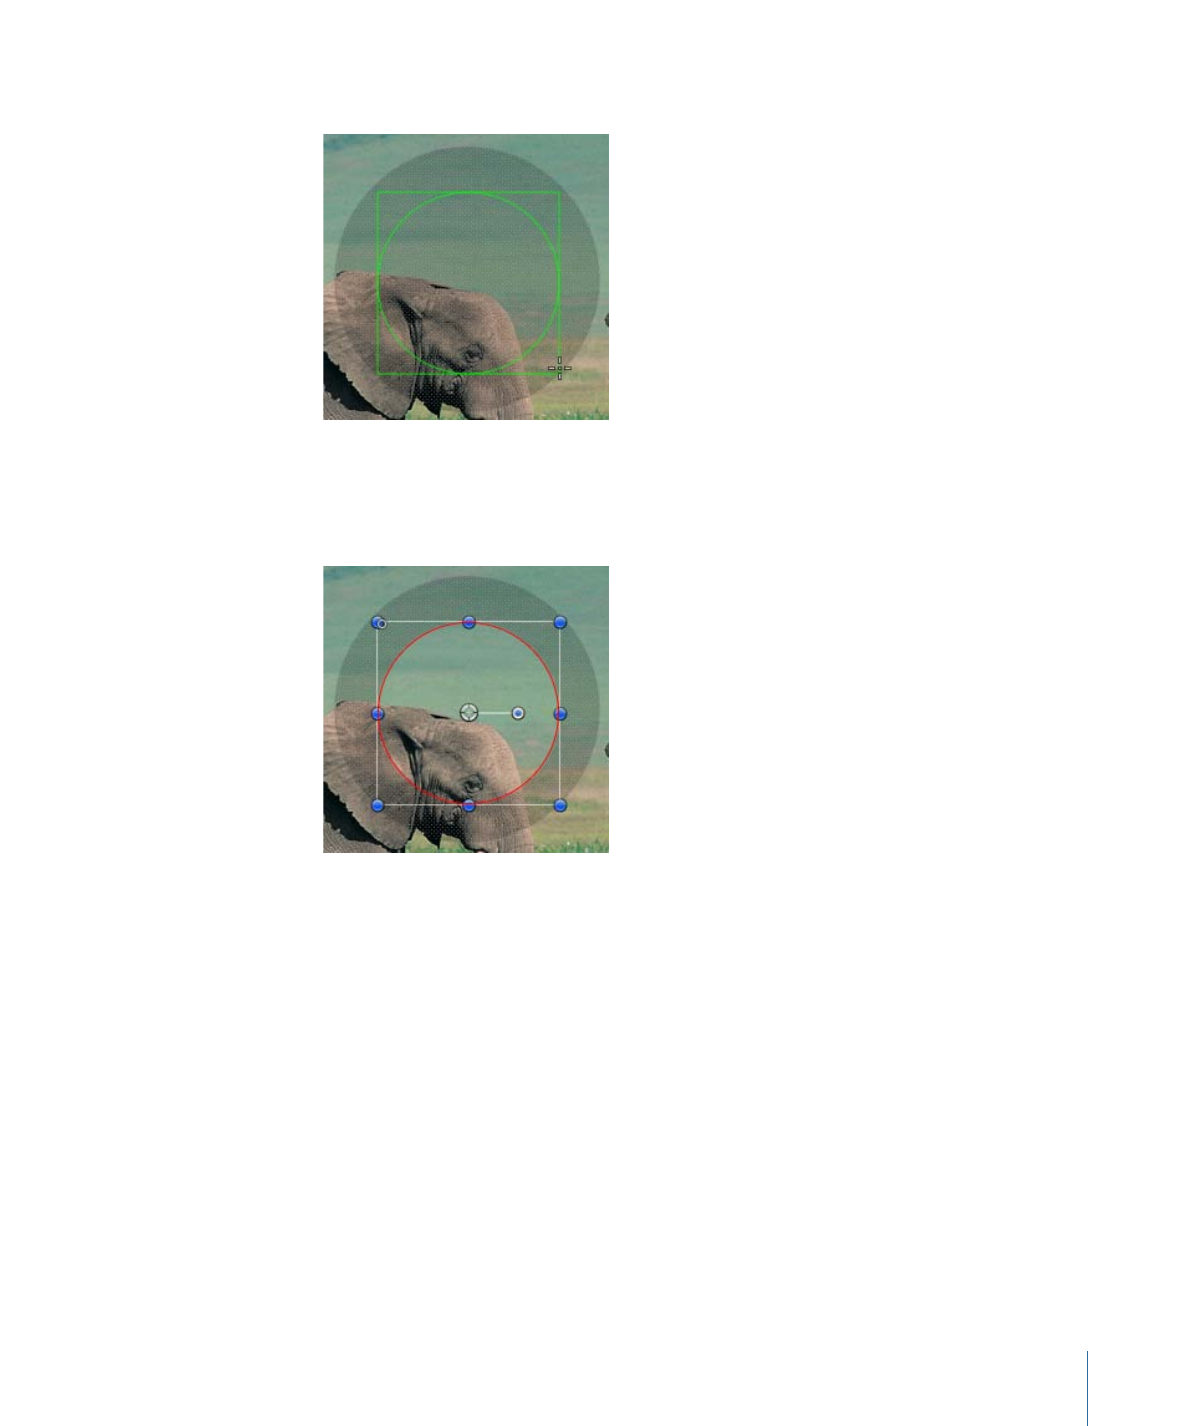
Use the following image as a reference:
The Texture Ring circle is masked. However, to simulate an SLR viewfinder focus ring,
you need to invert the mask.
c
In the Mask Inspector, select Invert Mask.
Tip: To align objects in the Canvas, use the Dynamic Guides and snapping (press N).
You can also select objects, then choose an option from the Objects > Alignment menu.
2
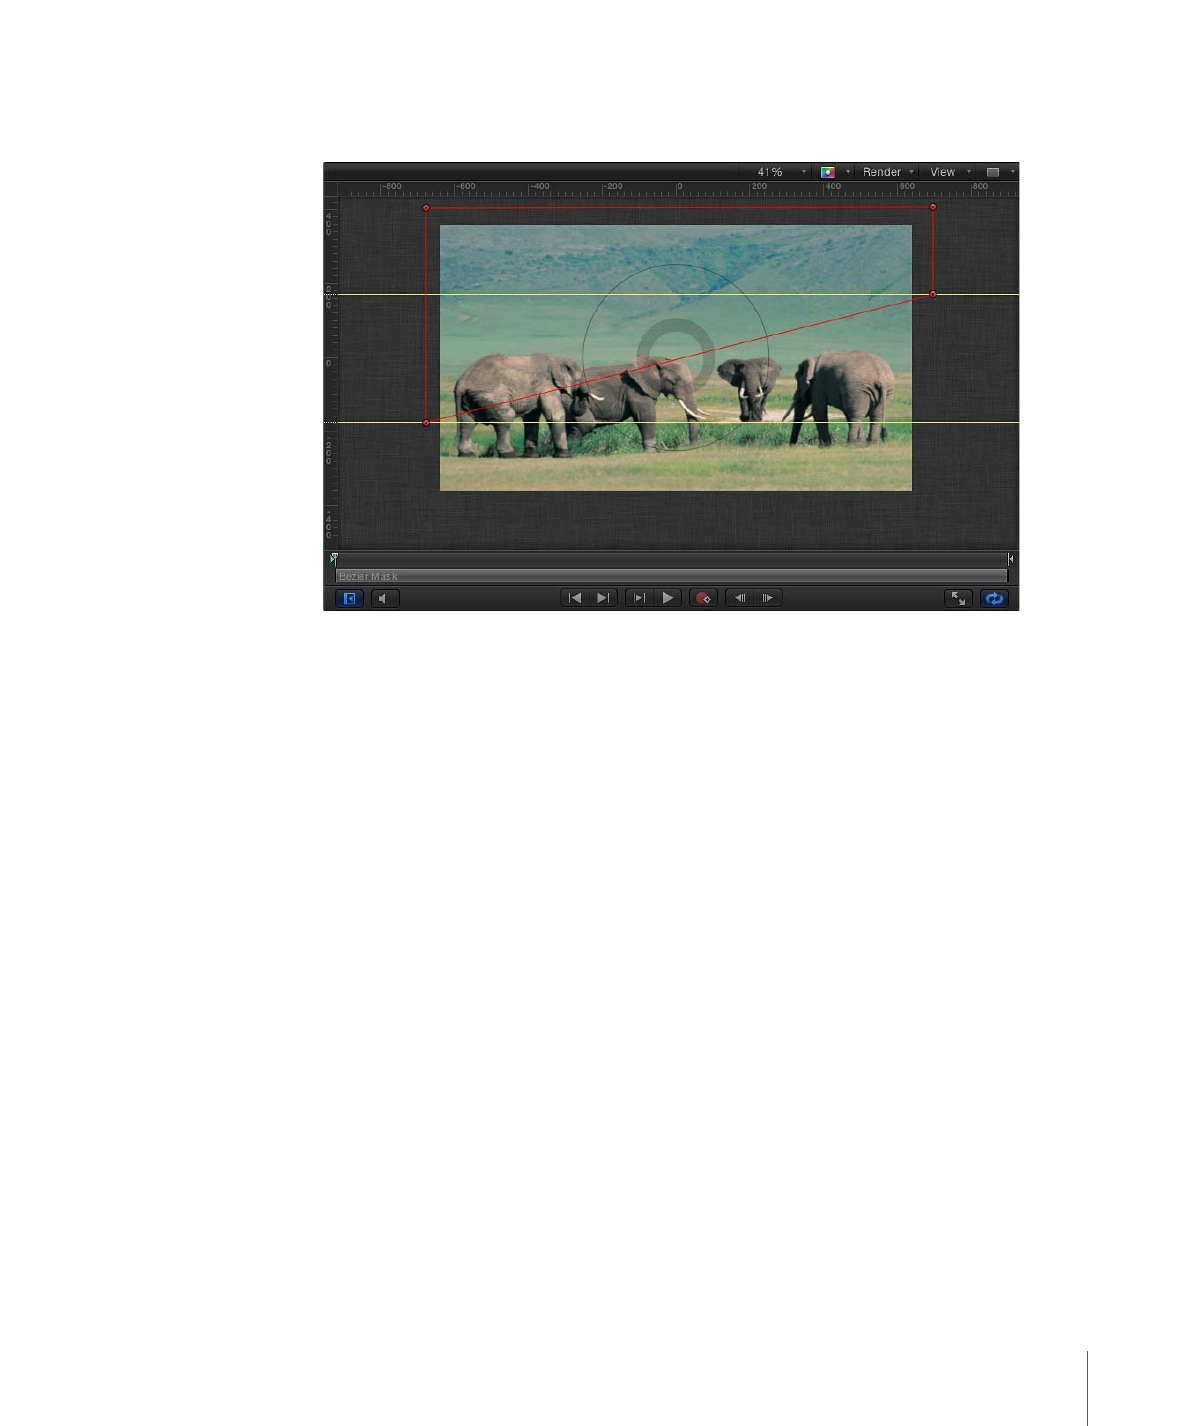
Add a mask to the Top Prism Group:
a
In the Layers list, select the Top Prism Group.
b
Choose the Bezier Mask tool from the Mask pop-up menu in the toolbar, then draw a
four-sided shape in the Canvas so that the bottom side crosses the center of the circle
graphics at an angle.
517
Chapter 11
Creating Templates for Final Cut Pro X
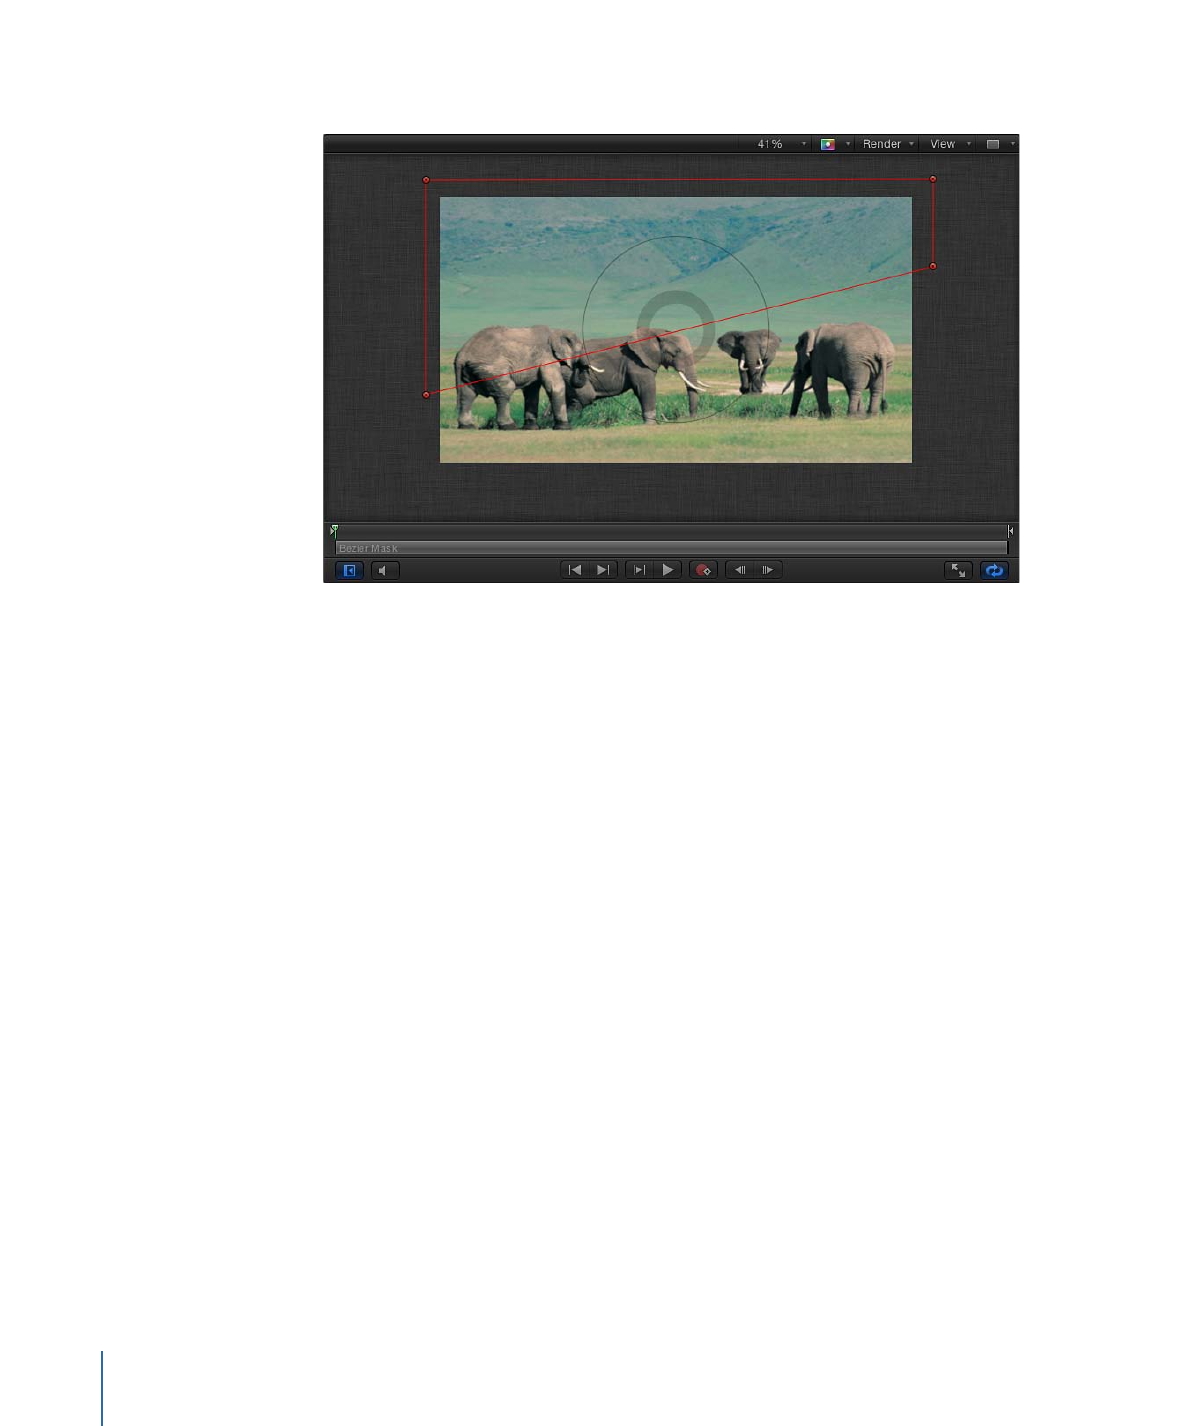
Use the following image as a reference:
Tip: To quickly zoom out of the Canvas, press Command–Minus Sign. Press
Command–Plus Sign to zoom into the Canvas. Alternatively, you can hold down the
Space bar and Command key (in that order), then drag diagonally in the Canvas. The
zoom occurs around the spot clicked in the Canvas.
c
With the mask selected, choose View > Show Rulers (or press Command-Shift-R).
518
Chapter 11
Creating Templates for Final Cut Pro X
d
Drag two guides from the horizontal ruler and align them with the lower-left and
lower-right corners of the mask.
3
Add a mask to the Bottom Prism Group:
a
In the Layers list, select the Bezier Mask created in step 2.
b
Choose Edit > Duplicate (or press Command-D).
c
Drag the Bezier Mask Copy to the Bottom Prism Group.
d
Choose the Select/Transform tool from the pop-up menu at the far-left side of the
toolbar.
519
Chapter 11
Creating Templates for Final Cut Pro X

e
Holding down the Shift key, drag the mask’s rotation handle 180 degrees.
f
Drag the mask downward until the upper-left and upper-right corners of the mask
align with the guides.
Tip: After you begin dragging, hold down the Shift key to confine movement to the Y
axis. To fine-tune the Y position of the mask, press Command–Up Arrow or
Command–Down Arrow, or adjust the Y Position parameter in the mask’s Properties
Inspector.
To see the effects of the masks, turn the Background Group off, then turn the Top Prism
Group or Bottom Prism Group off.
4
Add a mask to the Split Prism Group:
a
In the Layers list, select the Circle Mask that you applied to the Texture Ring layer, then
press Command-D.
b
Drag the Circle Mask copy to the Split Prism Group, then turn off the Background Group
to see the effect of the mask.
When the mask is applied to the Split Prism Group, it retains its inverted state, but
changes in scale. This is because the mask was applied to an object that has been scaled
(the Texture Ring). When applied to an object that is not scaled, the mask is applied at
its nonscaled size.
520
Chapter 11
Creating Templates for Final Cut Pro X

c
With the Circle Mask copy selected, deselect the Invert Mask checkbox in the Mask
Inspector.
d
With the Circle Mask copy selected, open the Properties Inspector and set the Scale
parameter to match the scale of the Texture Ring: 42 percent.
In the next task, create the rig that will control the positions of the Top Prism layer and
the Bottom Prism layer, simulating focusing the SLR camera.
To create the SLR effect rig
1
In the Layers list, select the Top Prism clone layer (not the Top Prism Group) and in the
Properties Inspector, do the following:
a
Click the Position parameter disclosure triangle to show the X, Y, and Z subparameters.
521
Chapter 11
Creating Templates for Final Cut Pro X
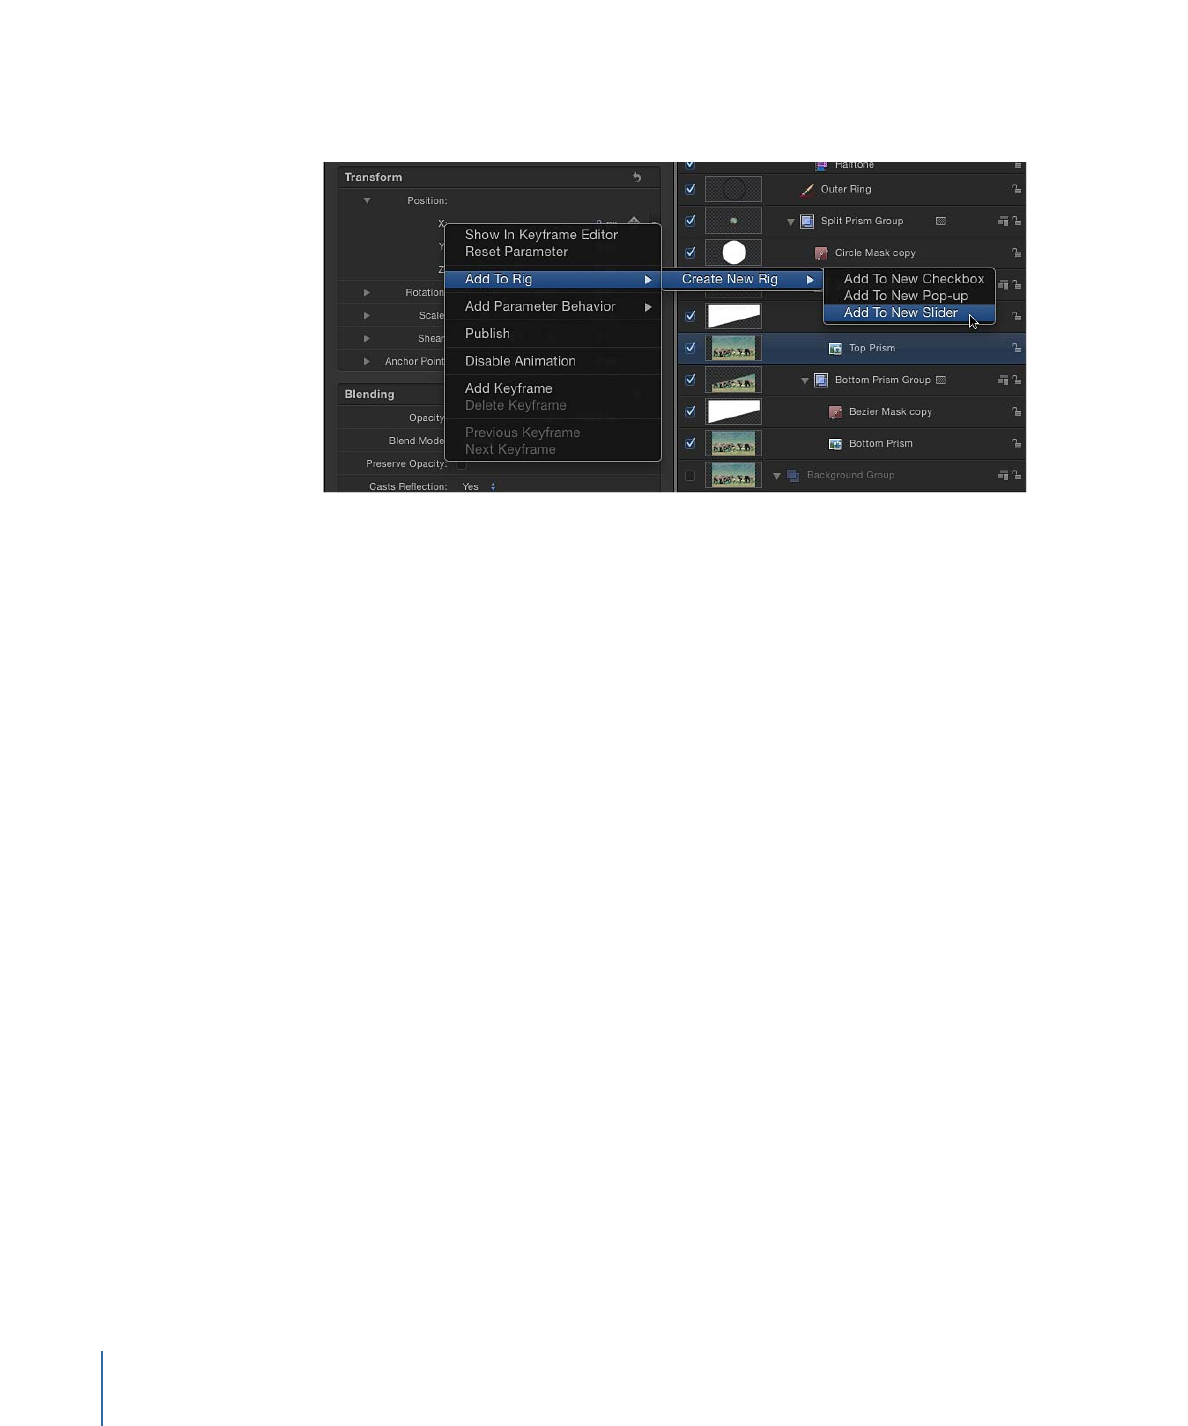
b
Control-click the X Position parameter name, then choose Add to Rig > Create New
Rig > Add To New Slider from the shortcut menu.
The Widget Inspector is displayed, and contains a single parameter: “Top Prism.X.” A rig
icon (a joystick) appears next to the parameter in the Inspector (as well as in the Properties
Inspector for the Top Prism clone layer). Rig and Slider objects also appear near the top
of the Layers list.
2
Select the Bottom Prism clone layer, and in the Properties Inspector, do the following:
a
Click the Position parameter disclosure triangle to show the X, Y, and Z subparameters.
b
Control-click the X Position parameter name, then choose Add to Rig > Rig > Add To
Slider from the shortcut menu.
3
In the Layers list, select the Gaussian Blur filter, then do the following:
a
Open the Filters Inspector.
b
Control-click the Amount parameter name, then choose Add to Rig > Rig > Add To
Slider from the shortcut menu.
4
In the Layers list, select the Rig.
522
Chapter 11
Creating Templates for Final Cut Pro X
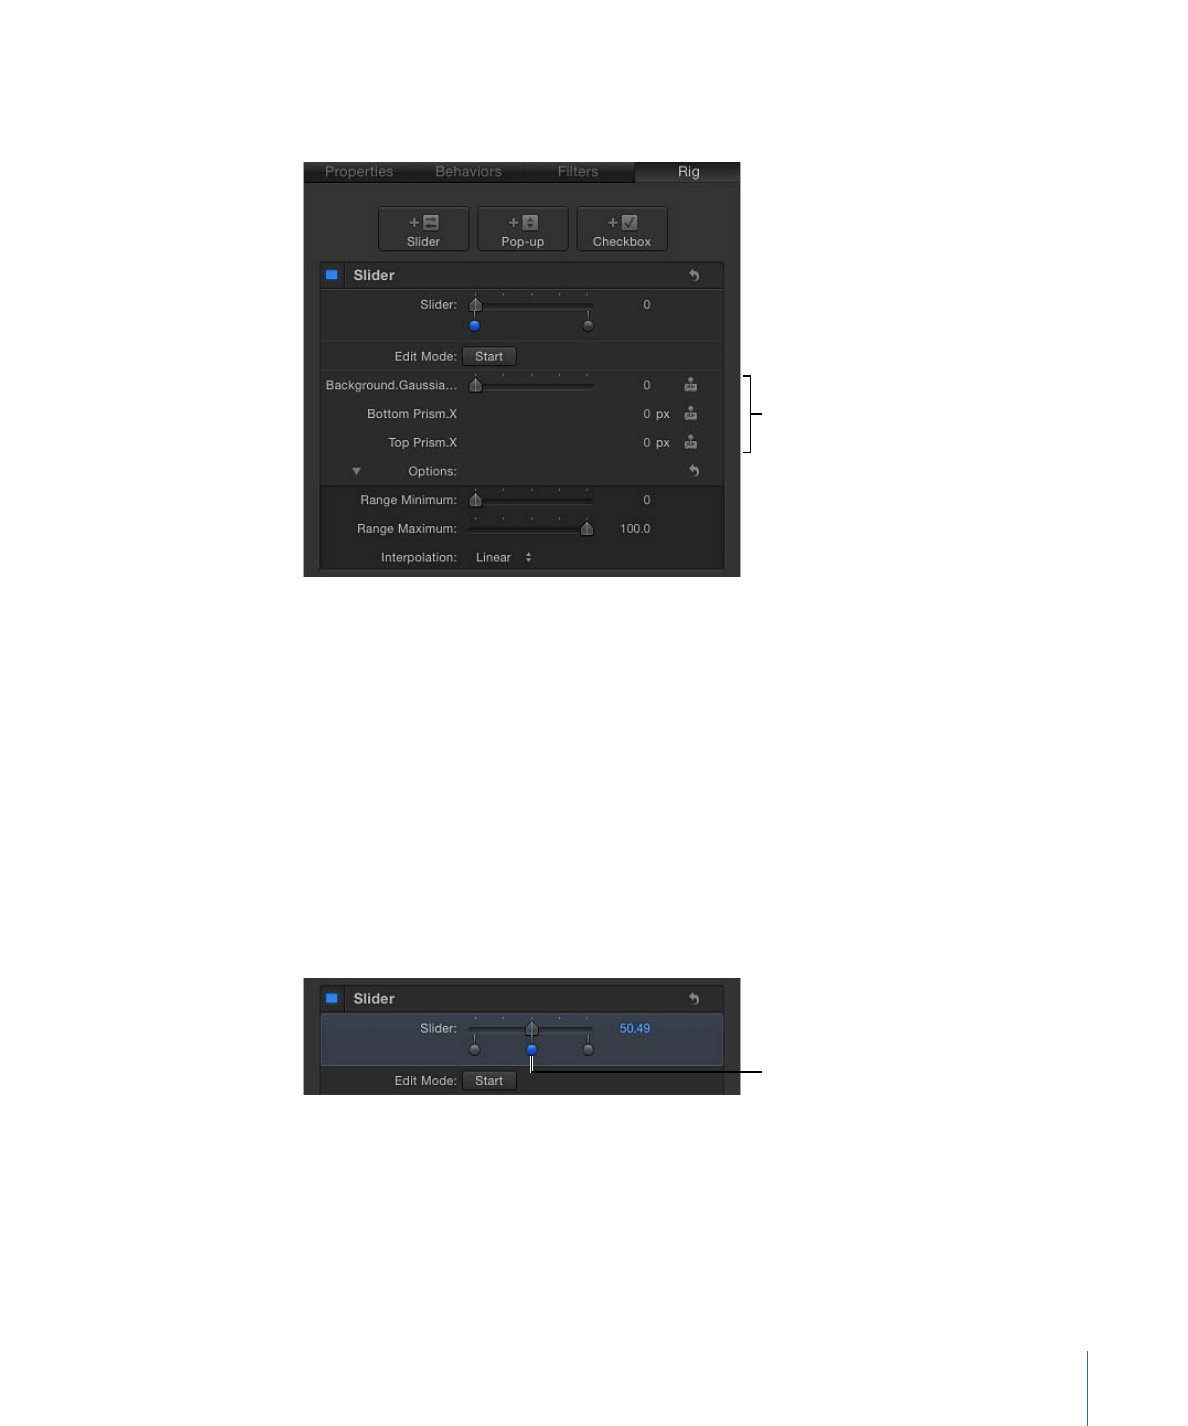
The rigged parameters appear in the Rig Inspector, with the most recently added
parameter at the top of the list.
Rigged parameters
In the next task, create three different snapshots simulating the viewfinder focus effect.
In the first snapshot, the top prism is shifted to the left and the background image appears
out of focus. In the second snapshot, the top and bottom prisms are aligned and the
background image appears in focus. In the third snapshot, the bottom prism shifts to the
right and the background image appears out of focus.
For detailed information on using rigs, widgets, and snapshots, see
Using Rigs
.
To create the SLR rig’s snapshots
1
In the Layers list, select the Background Group checkbox to see the effect of the snapshots
as you create them.
2
In the Rig Inspector, double-click just below the middle of the slider control to add a new
snapshot, then drag the snapshot’s blue tag to approximately 50.
Drag the blue dot
to adjust the value
of the snapshot.
3
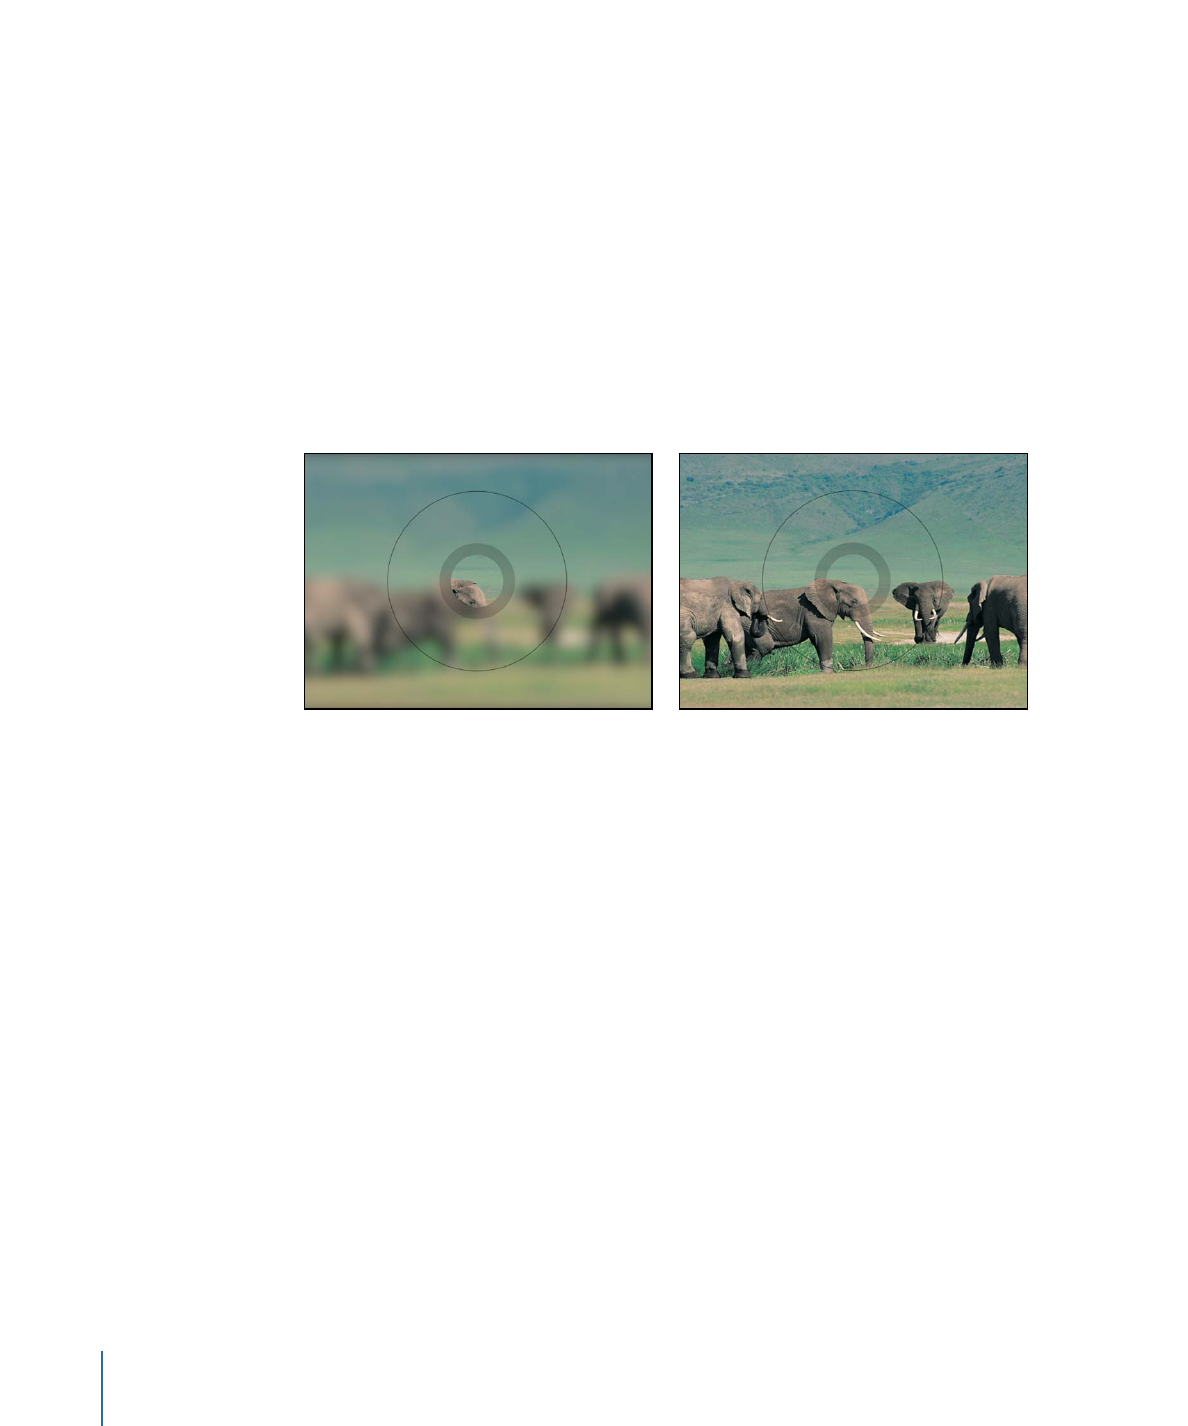
Click the first snapshot (the tag furthest to the left), then set the following values:
a
Set the Gaussian Blur.Amount to 150.
b
Set the Bottom Prism.X to 25.
c
Set the Top Prism.X to –25.
This snapshot simulates the viewfinder of an SLR camera focused at one extreme.
523
Chapter 11
Creating Templates for Final Cut Pro X
4
Click the third snapshot, then set the following values:
a
Set the Gaussian Blur.Amount to 150.
b
Set the Bottom Prism.X to –25.
c
Set the Top Prism.X to 25.
This snapshot represents simulates the viewfinder of an SLR camera focused at the
opposite extreme.
Note: The middle snapshots values remain at 0, representing the SLR camera lens in
sharp focus.
5
Drag the slider back and forth to see the effect of the rigged parameters.
Be sure to drag only the slider control, not a snapshot tag.
When the completed SLR effect is added to the Final Cut Pro X Timeline, this slider will
appear in the Effect Inspector.
In the next task, the rig slider will be published as “Focus.” In Final Cut Pro X, moving the
Focus slider back and forth will simulate focusing in an SLR camera viewfinder.
To publish the slider widget and the SLR effect template
1
In the Layers list, name the slider widget “Focus.”
2
Select the Rig or the Focus widget, then do one of the following in the Rig Inspector:
• Click the Focus slider’s Animation menu (the downward triangle that appears when
you place the pointer over the right side of the parameter row), then choose Publish
from the pop-up menu.
• Control-click the Focus slider’s parameter name, then choose Publish from the shortcut
menu.
3
In the Layers list, select the Project object, then open the Publishing pane of the Project
Inspector.
524
Chapter 11
Creating Templates for Final Cut Pro X
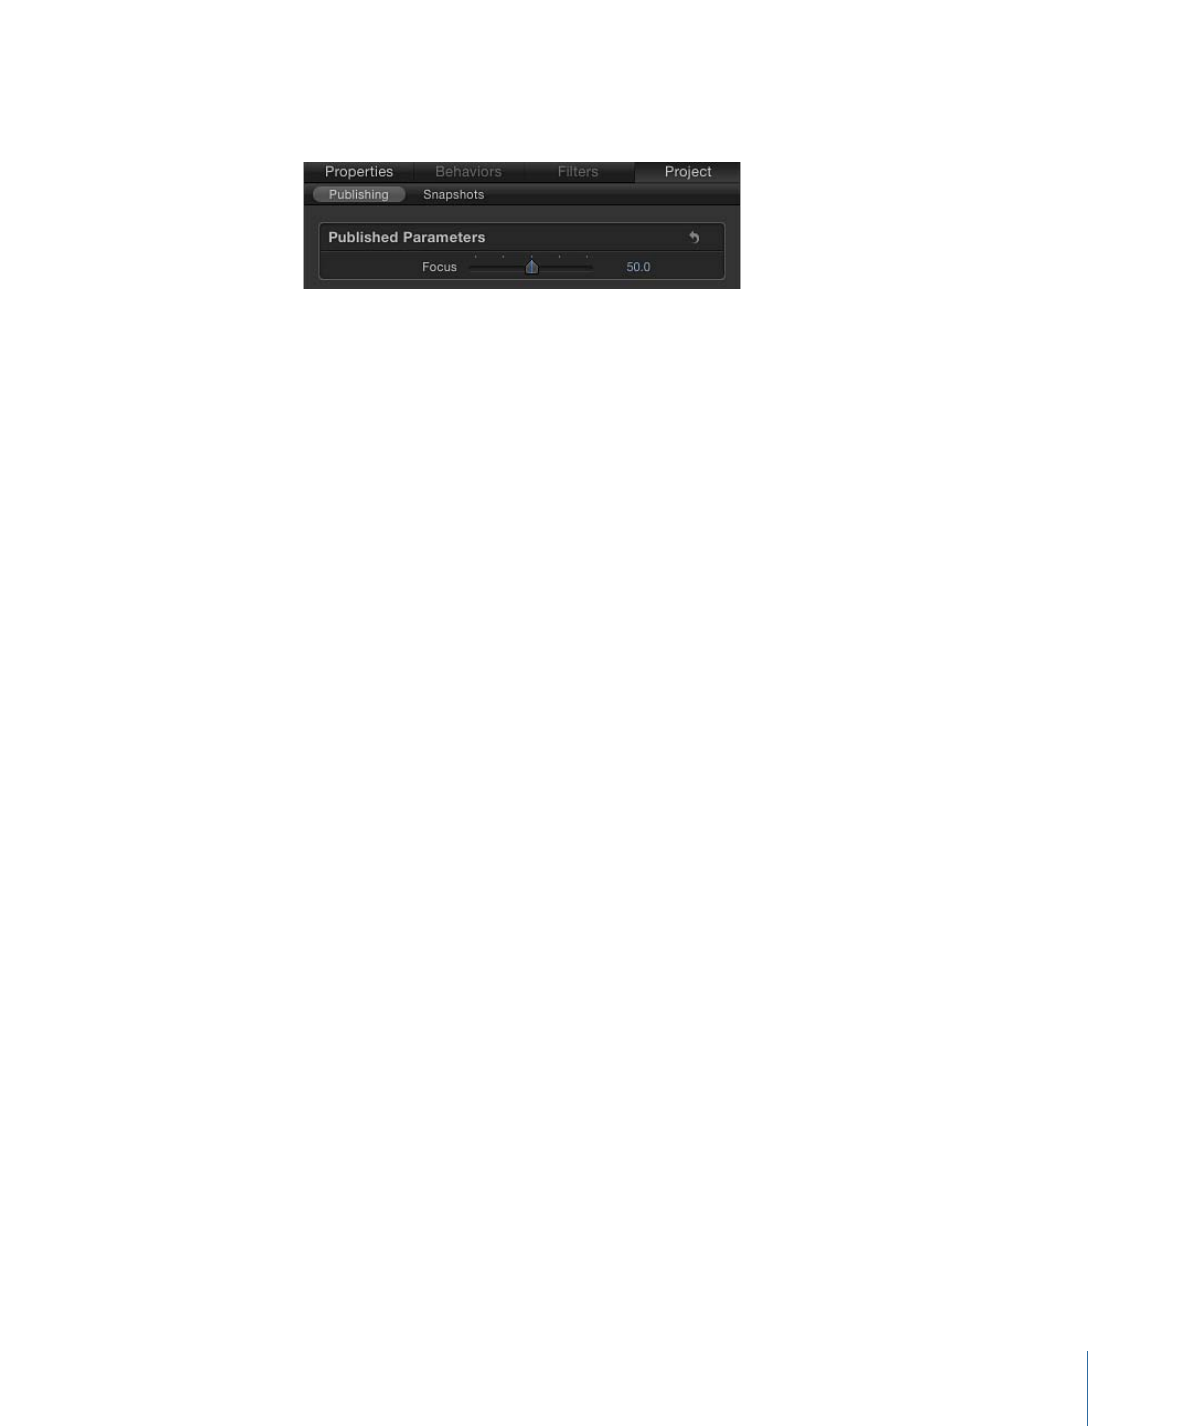
The Focus slider appears in the Published Parameters list, indicating which parameter
controls will appear in the Final Cut Pro Inspector.
4
Choose File > Save, then do the following:
a
In the save dialog, enter a name for the template.
If you don’t specify a name, the template appears in the Final Cut Pro Effects Browser
as “New Template.”
b
Choose a category from the Category pop-up menu.
You can also create a custom category. Categories appear in the Motion Project Browser
and the Final Cut Pro Effects Browser.
c
If needed, choose a theme from the Theme pop-up menu.
You can also create themes. Themes appear in the Motion Project Browser and the
Final Cut Pro X Themes Browser. A theme is a metadata tag that helps categorize
templates. For more information on Motion Project Browser themes and categories,
see
The Project Browser
.
d
If you don’t want a preview movie to appear in the Motion Project Browser, deselect
Save Preview Movie.
The template appears in the Final Cut Pro Effects Browser, ready for use. For information
on keyframing parameters in Final Cut Pro, see Final Cut Pro X Help.
e
Click Publish.